Soldering Guide
Intro
Soldering is a fundamental skill everyone who works with electronics should familiarize themselves with. Through the acquisition of this skill, you will open the door to a whole new world of exploration within circuit design, embedded systems, electronics repair, and so much more. If you’re interested, more information can be found on our resources page.
Before You Start
Soldering is a high-dexterity task. It requires coordination of both hands and deep visual inspection. During the learning phase, you will also be thinking carefully through each step. This means what you are about to do will require high levels of activity throughout almost your entire brain. That’s pretty cool, but what does that mean for you?
Performing High-Dexterity Work
You already know how to do a lot of high-dexterity tasks. We’ll use typing as an example. When you type, you have to coordinate each finger to push a sequence of buttons which represents a thought you wish to express through text. That’s a lot of moving parts!
If we think through how it is that we get better at typing, there are a few things that need to happen early on:
- Use the home keys as consistent reference points
- Anchor your hands to a fixed position (using thumbs, home keys, or your desk)
- Dedicate one finger to each key
- Use pattern recognition to increase speed, accuracy, and confidence
Most of these same lessons can be applied to any high-dexterity task. I have come up with a few general rules that are pretty universally applicable:
- Stabilize working surfaces
- Limit moving parts
- Reduce the scope of your focus
- Move one thing at a time
- Repeat each step the same way every time
We’re doing everything we can to increase consistency and predictability while decreasing cognitive load. The fastest way to do so is to develop muscle memory. That means we want to break this process down into easy, repeatable steps that are performed the same way every time. With that mental framework in mind, you are ready to learn how to solder.
Soldering Your First Through-Hole Component
Stabilize Working Surfaces
Following the process we established above, we’re going to start by stabilizing our working surfaces. With a blank PCB, this should be easy. The board will sit flat on the table. Once you place components and flip the board, it may become unstable. To remedy this, use board clips if they are available or place something like a pair of tweezers under the board to prevent it from wobbling.
Limit Moving Parts
There are several things we can do to limit movement while we work. The first thing to do is make sure you have all of the tools you need within reach. You’ll need:
- Soldering Iron
- Solder Wire
- PCB
- Components
The next thing we will do is orient our tools and place components. Your dominant hand will hold the soldering iron and your non-dominant hand will hold the solder wire. If needed, move things around to put them within reach of the correct hand without having to cross your arms. If you are sharing a soldering station, work with your partner to find a compromise that works for both of you.
I recommend starting with a through-hole resistor. They are the easiest components to contend with because of their relatively high heat tolerance and lack of polarity (meaning orientation doesn’t matter).
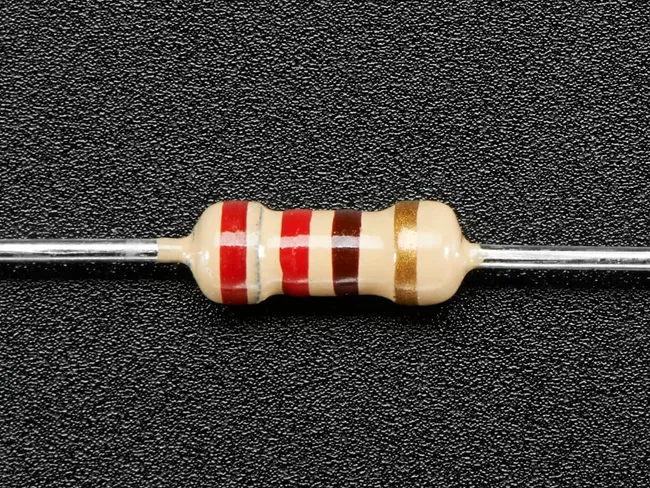
Bend the pins on either side, feed them through the appropriate holes in the PCB, and bend the pins outward to prevent the component from walking back out of the holes. Now that your component is placed, flip the board to gain access to the surfaces which need soldering. You might need to stabilize the board after it is flipped.
Once the board is oriented and stabilized, you can grab your iron and wire. Anchor your hands on the table close enough to the board/component that you can articulate the iron/wire with your fingers. Think about moving the iron/wire the same way you would a pencil. That iron is getting hot, and now it’s time to focus!
Reduce The Scope of Your Focus
Now that your board/component are in place, your tools are in hand, and you have anchored your hands in their proper positions, your scope of focus can narrow to the specific joint you wish to solder.
Move One Thing At A Time
The diagrams below show the process for adding solder to a joint. Each step should be completed in isolation.
- Place soldering iron on the board contacting the component lead and the copper pad on the board. Hold it there until the joint is complete.
- Touch the other side of the lead/pad on the side opposite your iron to melt the solder wire. If this doesn’t work after a few seconds, remove your iron, add a small amount of solder directly to the iron, and try again.
- Once you see solder flow into the hole, remove the solder wire, and then remove your iron.
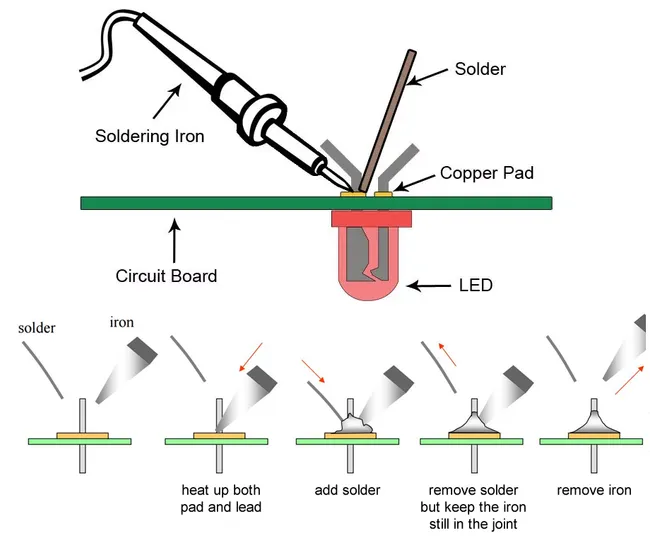
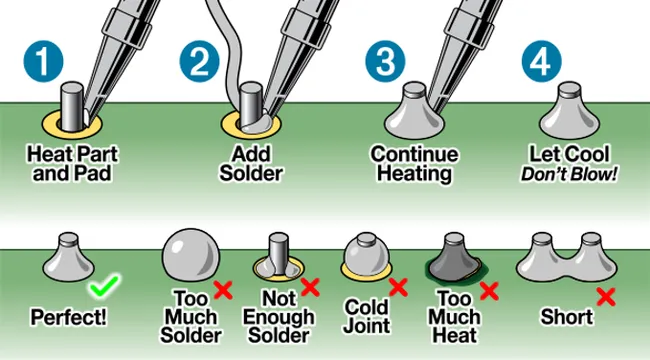
These images have been around a while, but the earliest instances I was able to find were here:
- Eleccelerator
- Makerspaces
Feel free to reach out if you know the origins of these diagrams.
Repeat Each Step The Same Way Every Time
As you move around the board, the orientation of the components will change. It is better to move the board and keep your hands in the same place than to move your hands based on the orientation of the components. This will assist with building muscle memory and reduce the chances for mistakes and/or injury.
Soldering Your First Surface-Mount Component
The same process that we go through for through-hole soldering applies for surface-mount components. We still want to stabilize work surfaces, limit moving parts, reduce the scope of focus, move one thing at a time, and repeat each step the same way every time. That being said, the process differs slightly in that you have to switch tools with your non-dominant hand halfway through.
- Add solder to one of the pads. For surface-mount components that have more than two legs, I’ll typically pick the corner closest to my iron.
- Swap the solder wire in your non-dominant hand with a pair of tweezers, and grab your component bearing in mind its intended orientation.
- Hold the component in place on the board.
- Reheat the solder from step one until it melts and the component sinks in place.
- Continue holding the component in place while you remove your iron and wait on the solder to re-solidify.
- If done correctly, the component should be anchored flat on the board and the other side should align nicely with its corresponding pad. If not, repeat steps 3-5 until everything is aligned. Don’t get discouraged, this might take a few tries.
- Swap tweezers with solder wire and add solder to remaining pads/legs.
On surface mounted components with legs, solder should typically flow over the top of the legs. On components with contacts on the side/wall of the component, solder should flow in an arc similar to what the through-hole diagram shows.