Build-A-Badge Guide
Summary
Welcome to the Build-A-Badge workshop, Brought to you by 615-Labs and hosted by the Makers’ Village at DC34, where all your dreams come true, blah blah blah. You bought the badge because it looked cool and now you’re thinking, ‘how in the heck does this thing go together?’
“With care” is my answer. I’m not just being cute when we say that.
But seriously, thank you very much for your purchase of this badge. All proceeds are being paid forward in order to further enable the geeks of 615-Labs & Makers’ Village to continue volunteering their time and efforts to bring new individuals in and teach them on free soldering workshop boards across the country. You’re also enabling local makers to continue their passions and get paid for the dedication they show to their craft.
Without further ado, let’s build this thing!
Assembly Info
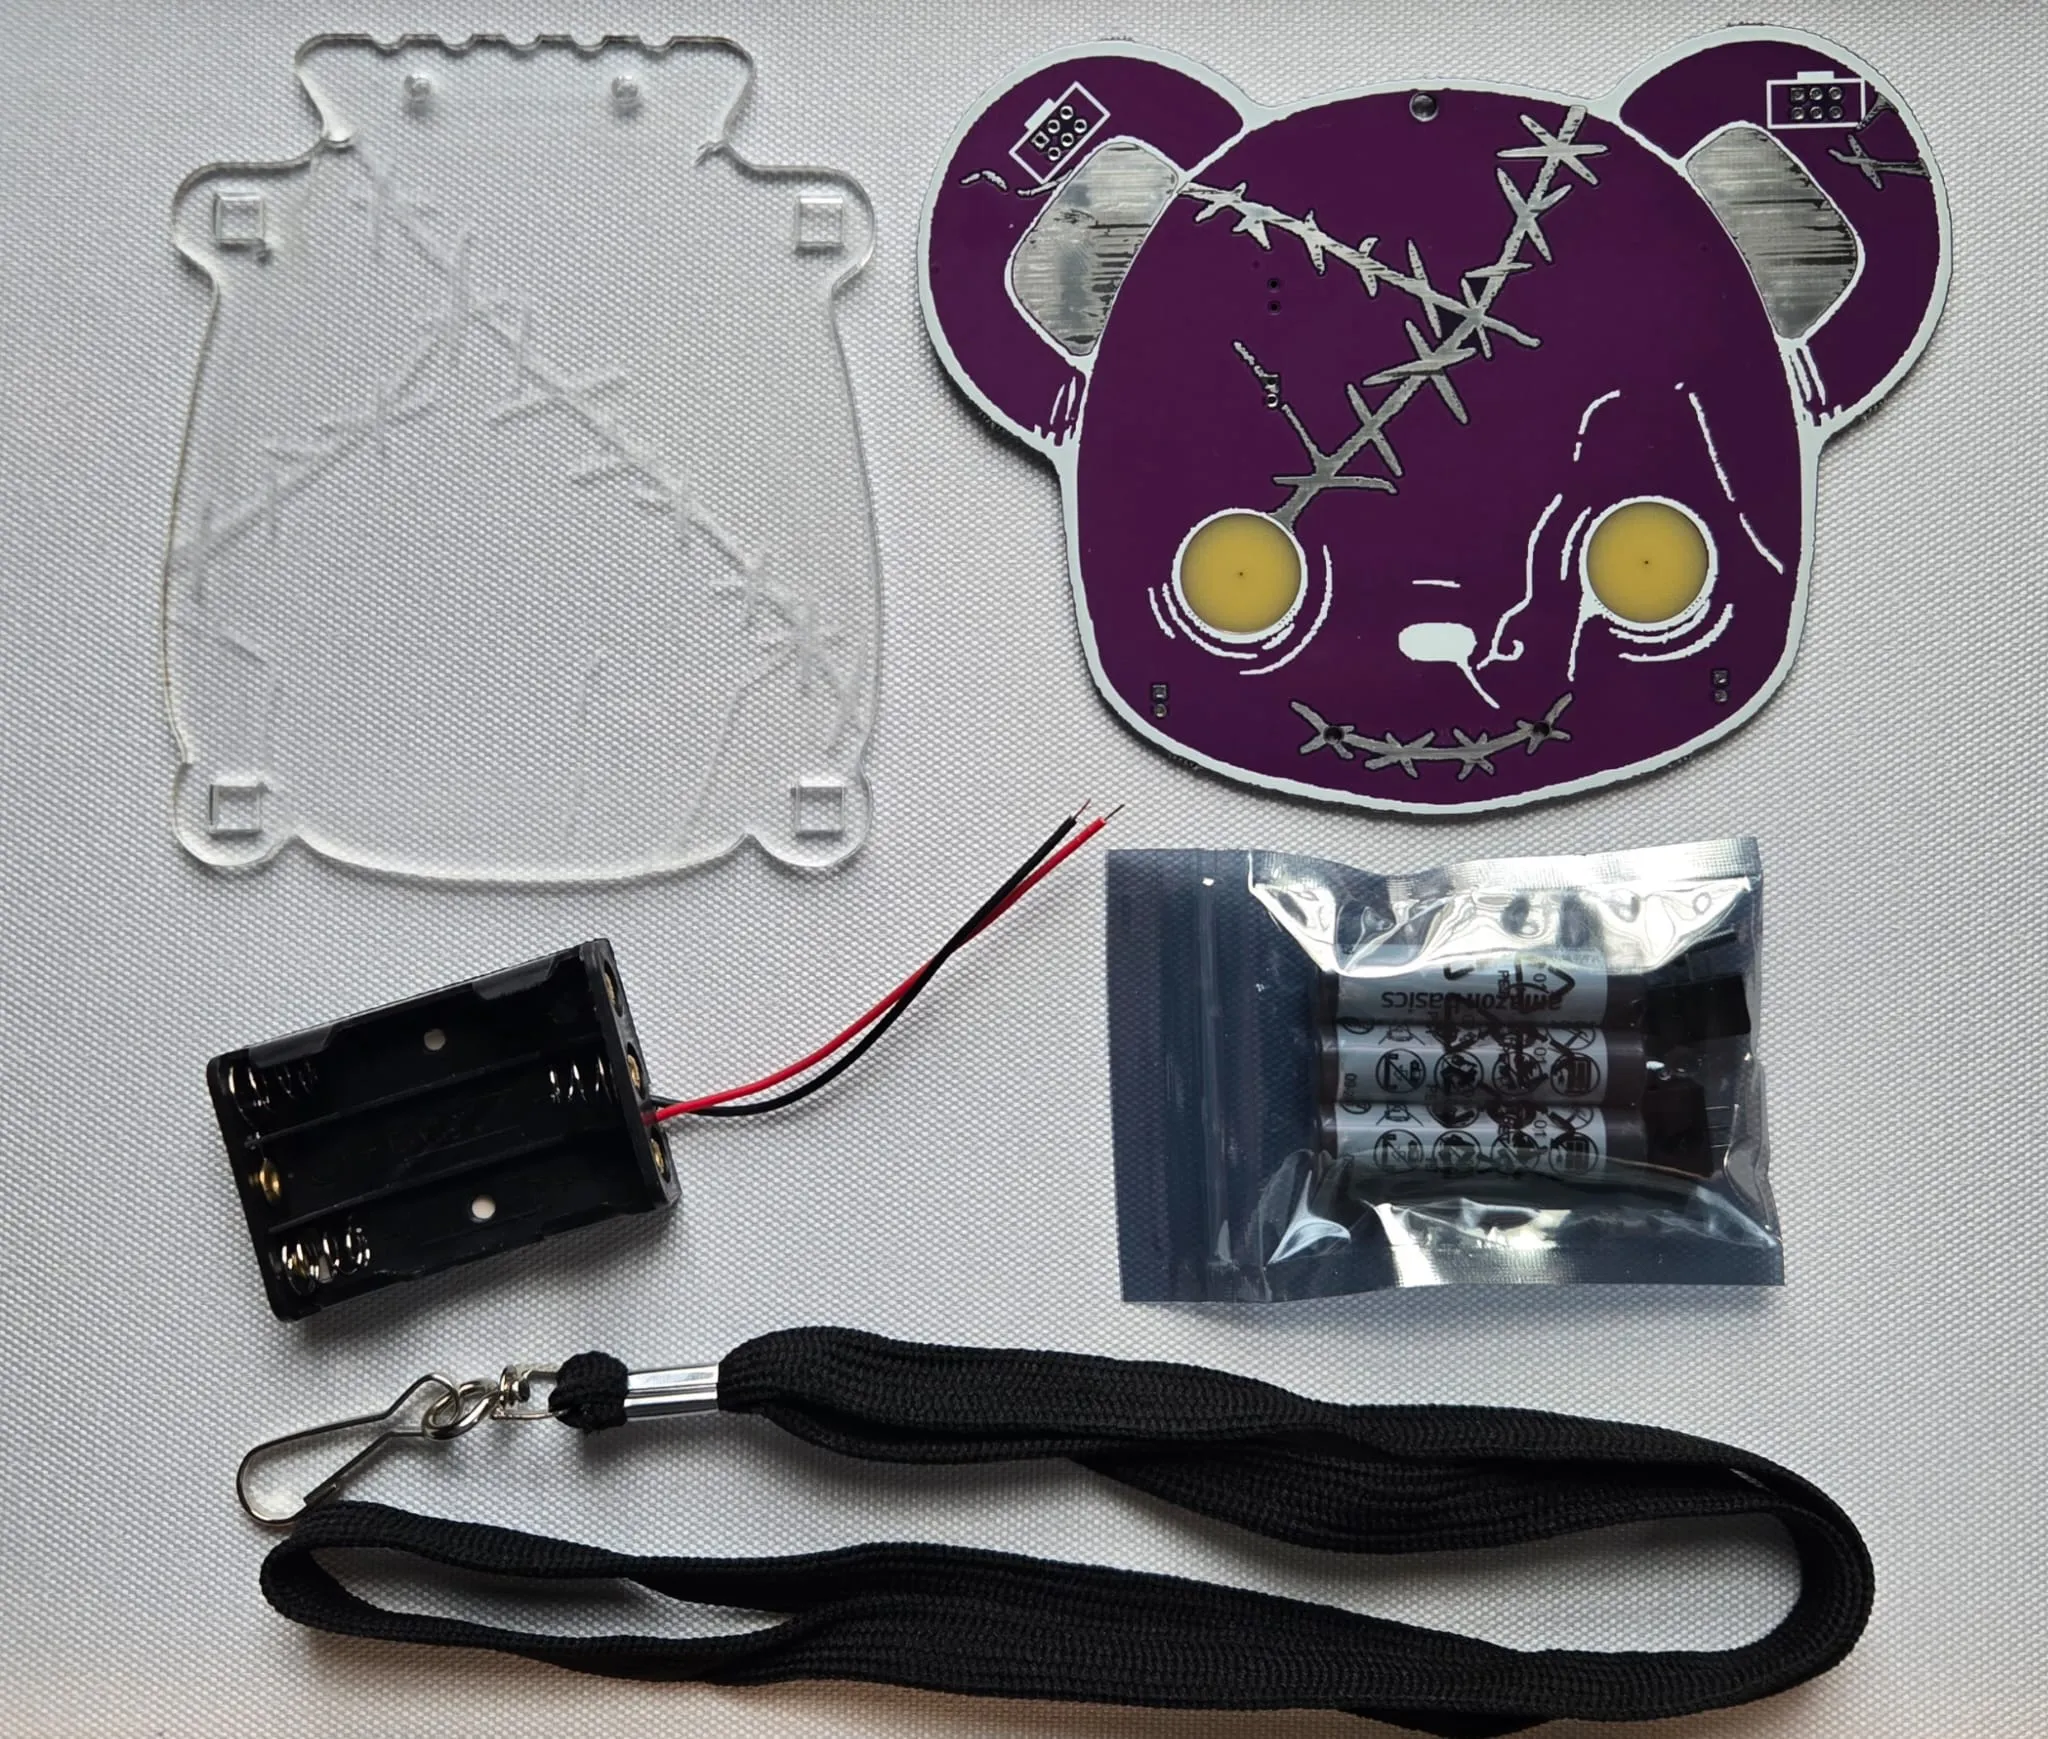
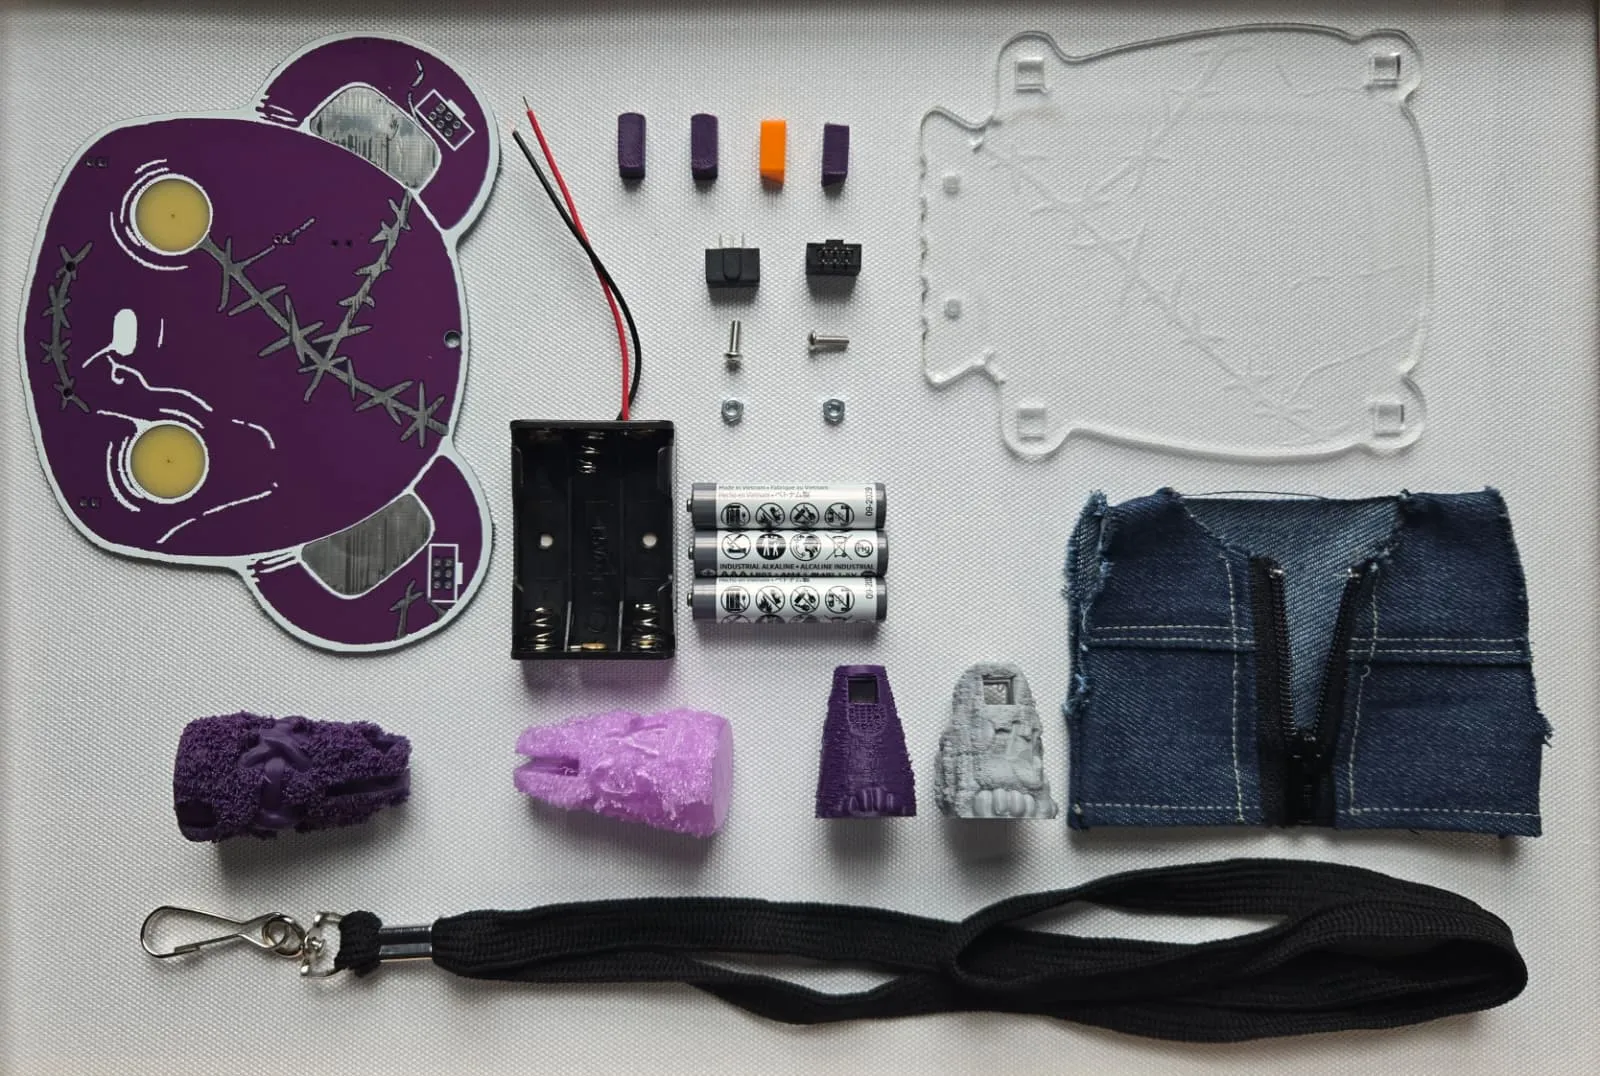
What comes in the Kit
1x PCB Bear Head
1x Acrylic Bear Body**
1x Standard Black Lanyard
1x 3 AAA Battery Box
1x Left Arm
1x Right Arm
1x Left Leg
1x Right Leg
1x Battle Jacket
1x Small Components Kit**
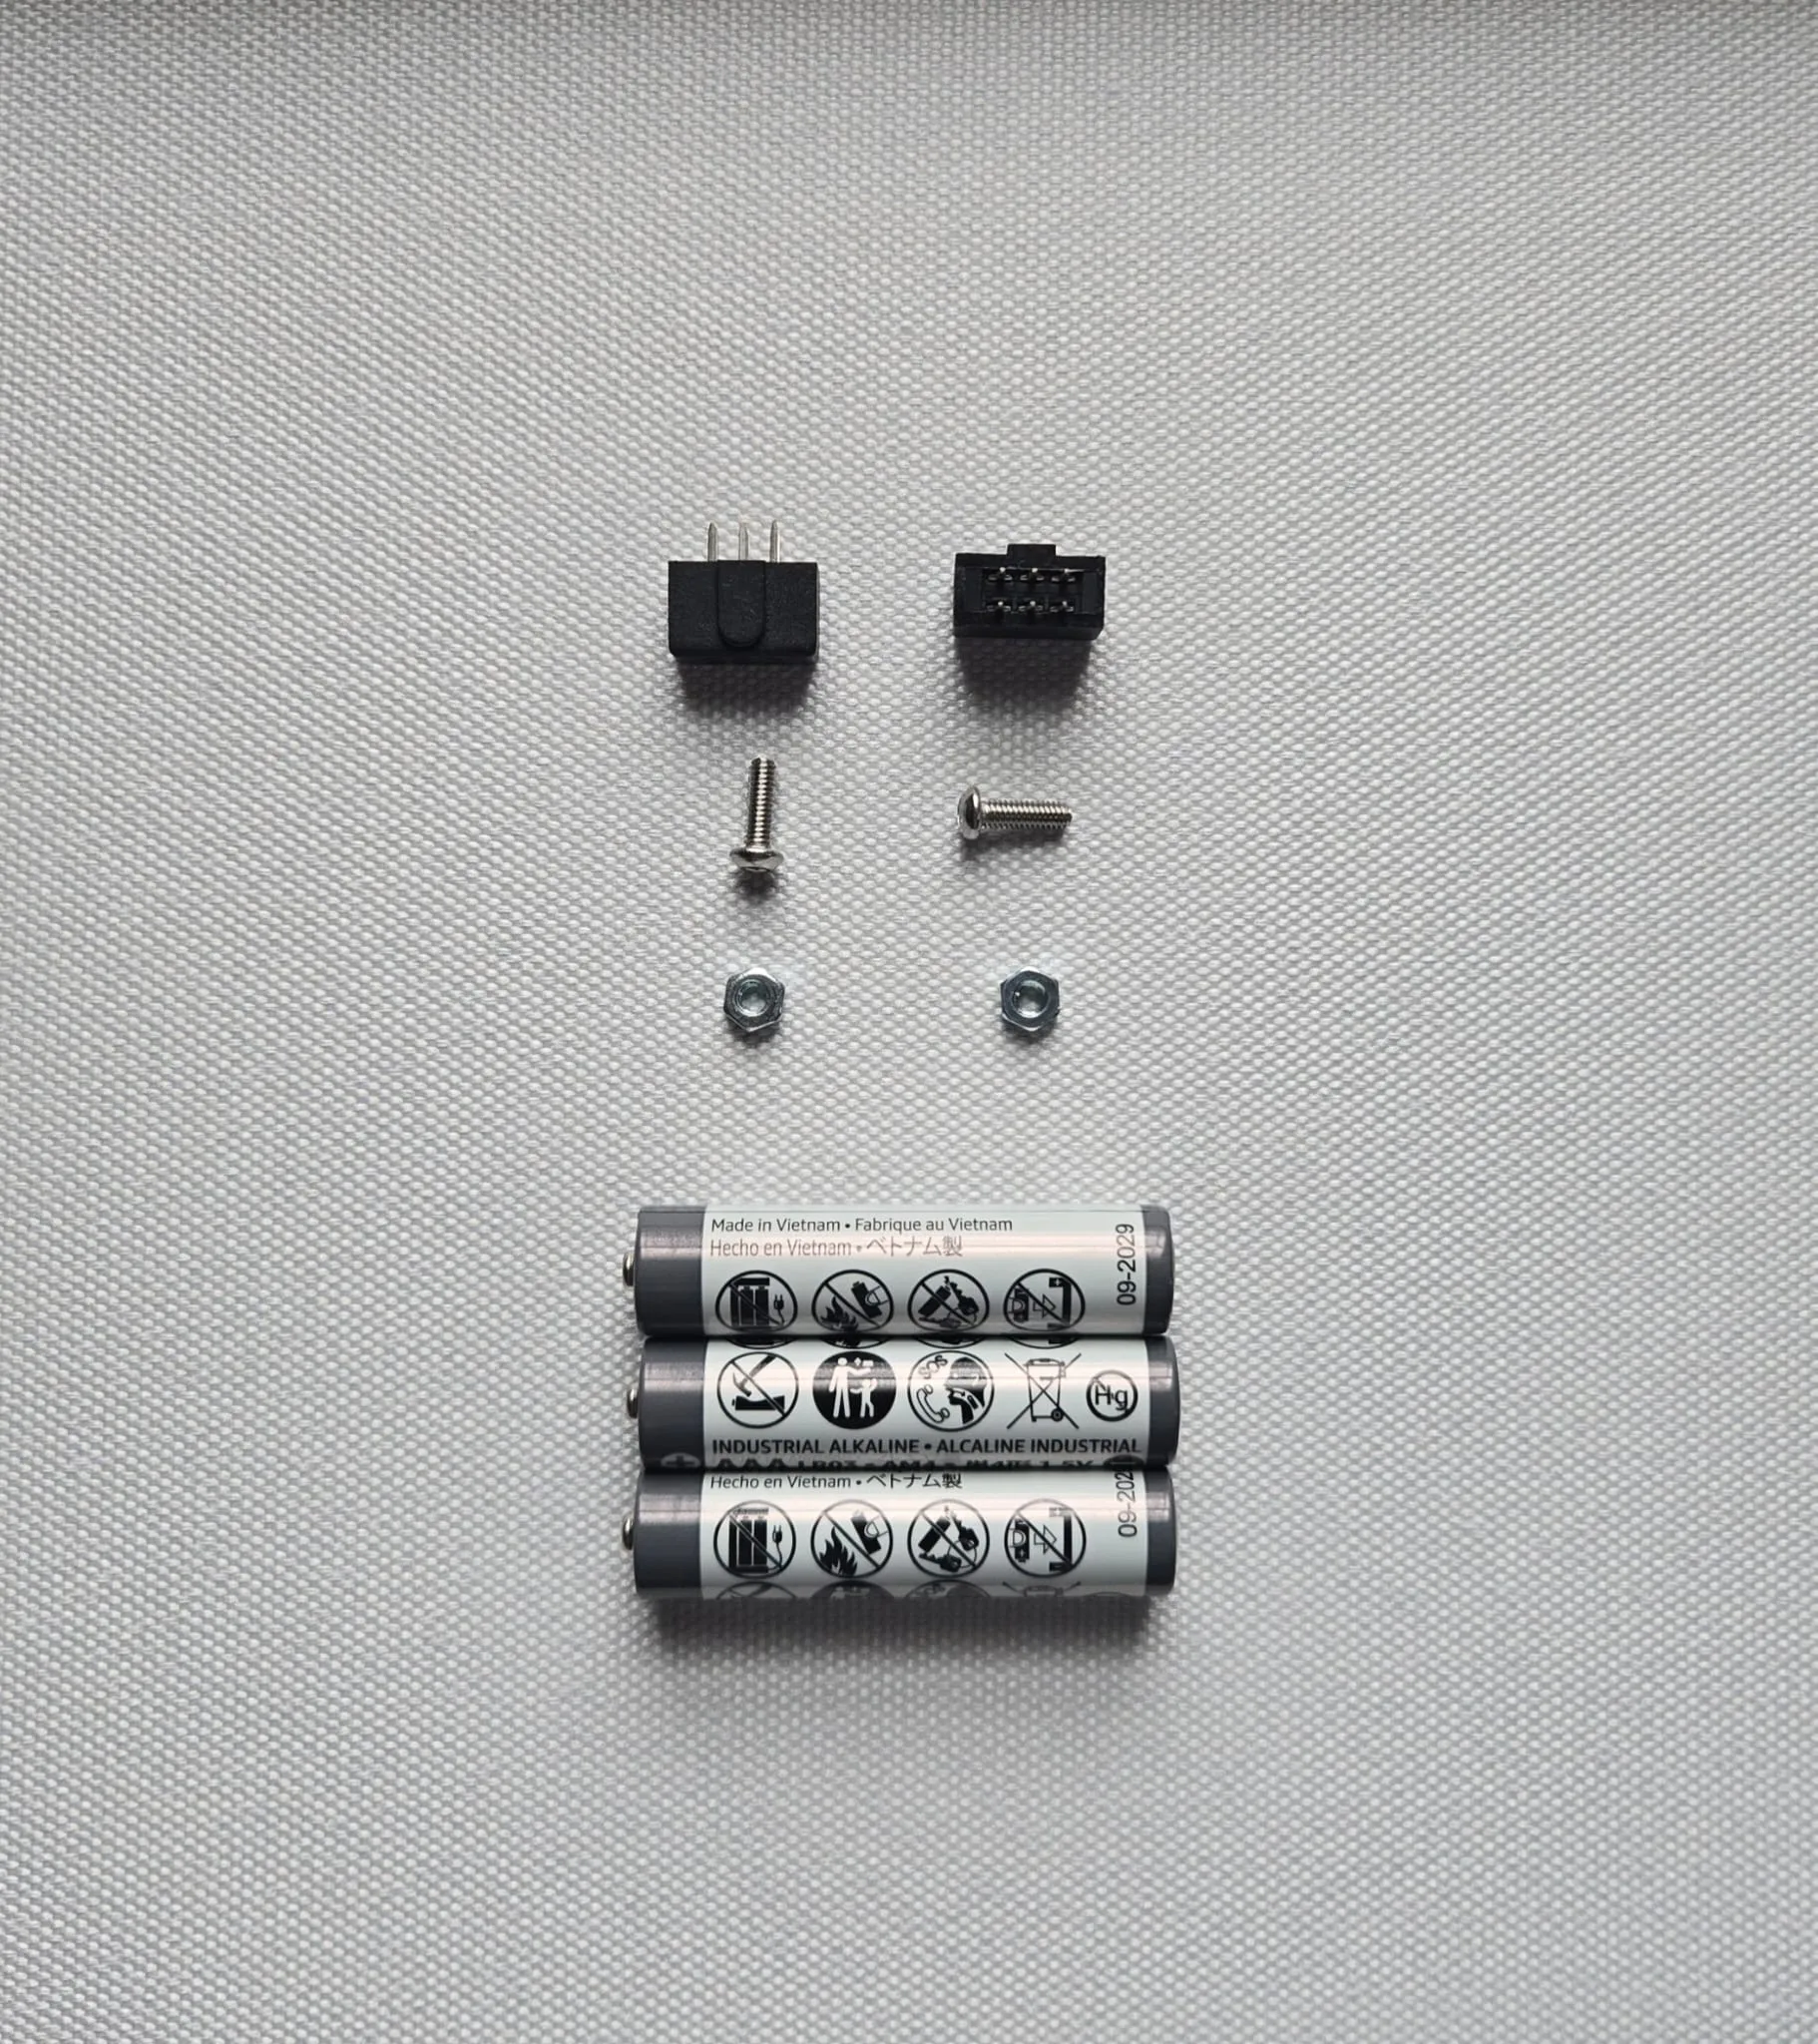
 Small Components Kit (that mini bag in the kit) should include:
- 1x Left Arm Joining Peg
- 1x Right Arm Joining Peg
- 1x Left Leg Joining Peg
- 1x Right Leg Joining Peg
- 3x AAA Batteries
- 2x Keyed Female through hole SAO connectors
- 2x assembly screws
- 2x assembly nuts
CAUTION: A note on the Acrylic Body These are not as fragile as glass, but please take care in the handling of the acrylic bodies. We attempted to reinforce them in multiple places by way of minimizing material cuts and etching depths, testing multiple iterations, & using thicker stock for the final product. While we know they’re not going to stop a speeding bullet, they also shouldn’t shatter unless the user, YOU, are being a bit neglectful.
The battle jackets also offer some cushion for expected wear and tear during the conference, but please be cautious. Likely best practice not to take your badge partying with you.
Assembly Line Starts HERE
- Find an even, flat surface to place the bag of components and your acquired limbs on.
- Solder the Battery Box:
- For the first step, you’ll need the Battery Box and Bear Head only
- Battery Lead Connections can be found on the back of the head next to the ‘615-Labs’ Logo
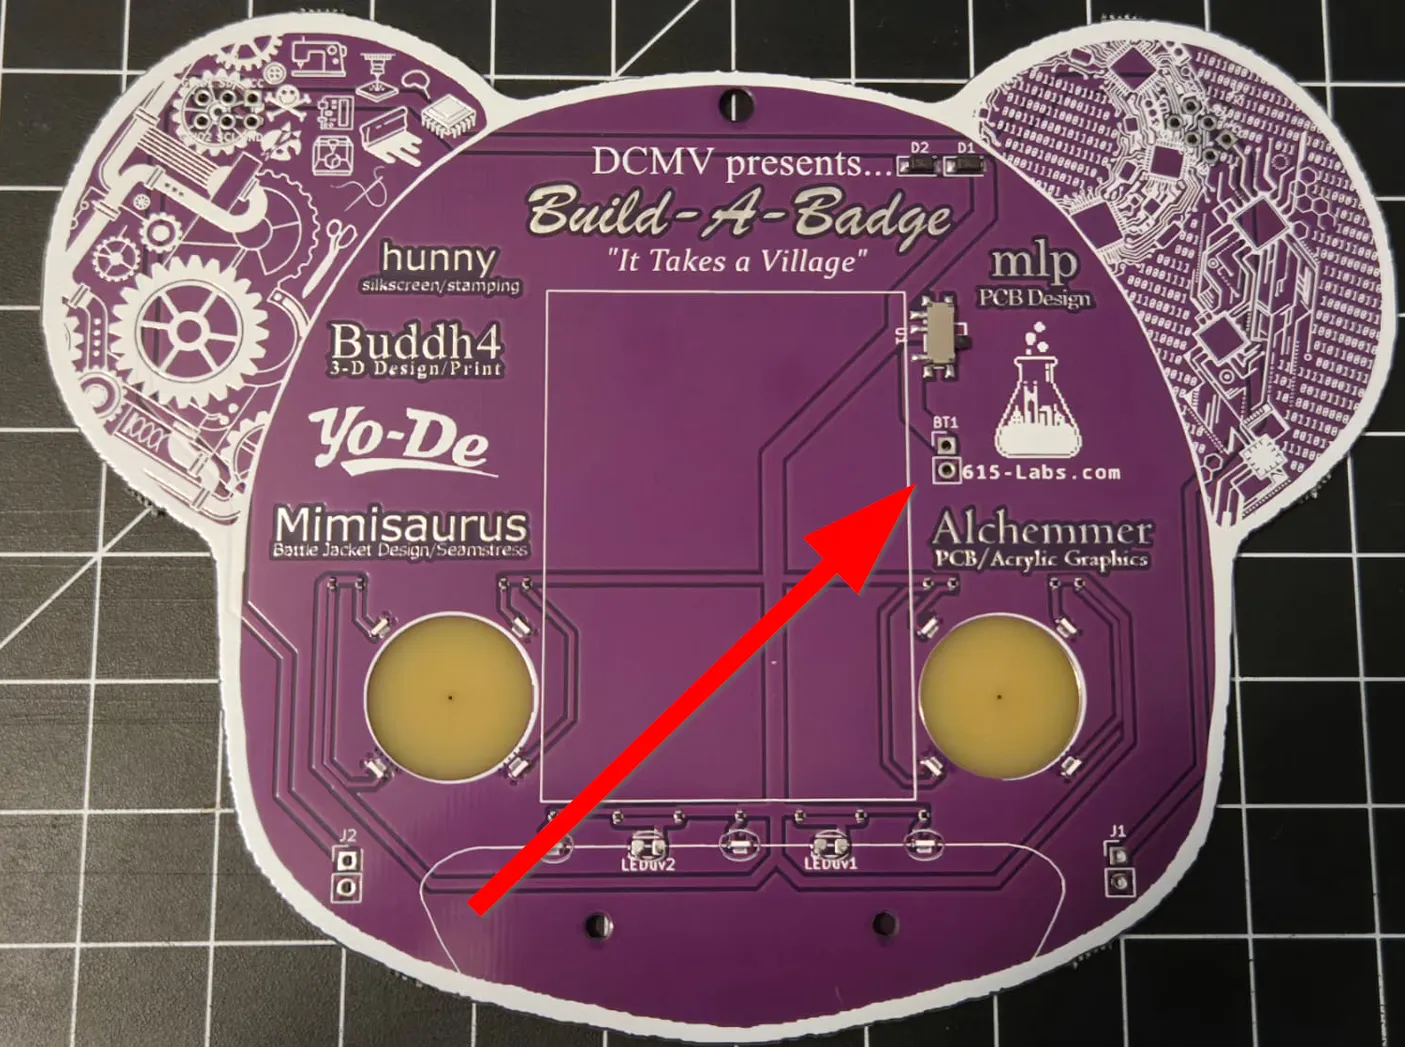
- IMPORTANT: if you read nothing else from the assembly guide, please read this:
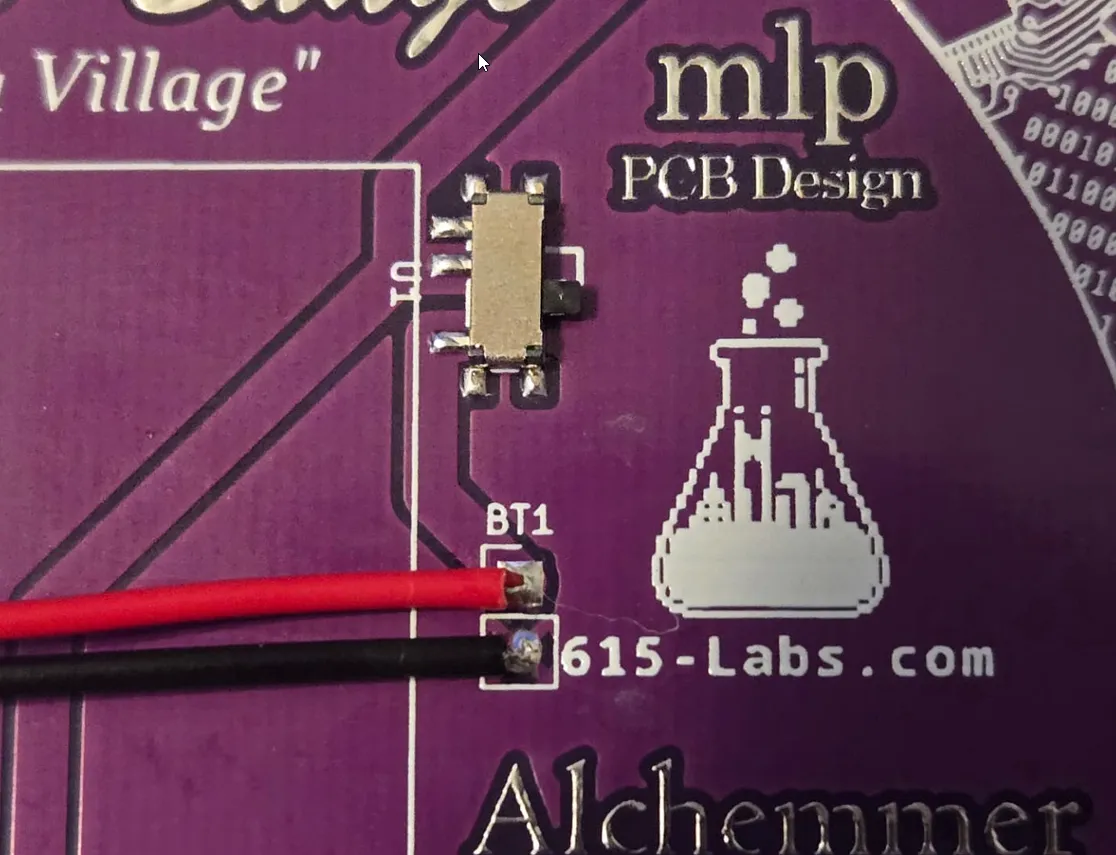
- The BLACK LEAD goes in the ROUND HOLE
- The RED LEAD goes in the SQUARE HOLE
- PLACEMENT:
- Twist the leads on the battery box. (This is so they don’t fray as you’re inserting them into the holes)
- Place the BLACK LEAD first in the bottom/round hole
- Hold it in place and rub your finger across the face of the badge to get the wires to lay flat until you can solder it
- Repeat for the RED LEAD in the top/square hole
- Hold it in place and rub your finger in the SAME DIRECTION
- This should hold temporarily until you can solder the leads in place.
- Soldering Tips (See our soldering guide!)
- QUICK TIP (for those new to soldering): Controlling a soldering iron is like writing with a pencil and writing with a pencil requires anchoring your pencil/dominant hand on a surface while not letting the pencil touch the page until you’re ready to use it. (The same principle applies here, only the pencil you’ll be holding it about 800 degrees Fahrenheit) With that in mind, anchor your soldering/dominant hand on the table as if you’re writing with a pencil. Let your writing instinct take over to move the tip of the iron around. This requires a little spacial awareness and dexterity, but we’ve taught children, the elderly, and con members suffering from Parkinson’s Disease (side effects being trembling hands). If they can do it, SO CAN YOU!
- Get your head, battery box, soldering iron, and some solder ready.
- Orient the board so your dominant hand is on the OPPOSITE side of the hole as the wires. (If you’re a lefty, you’ll need to turn the head upside down for the correct orientation)
- Place the hot end of the soldering iron ON THE PAD. (If you place it on the wire, you could risk a cold solder joint; cold solder joints == BAD)
- After 5-8 seconds, you should be able to FEED the solder into the hole and it will melt.
- IF the solder does not melt, you need to get more SURFACE AREA and make sure the iron is touching as much of the pad as possible
- Continue adding solder until you get a nice, even mound
- Repeat for the secondary wire
- Your final product should look similar to this:
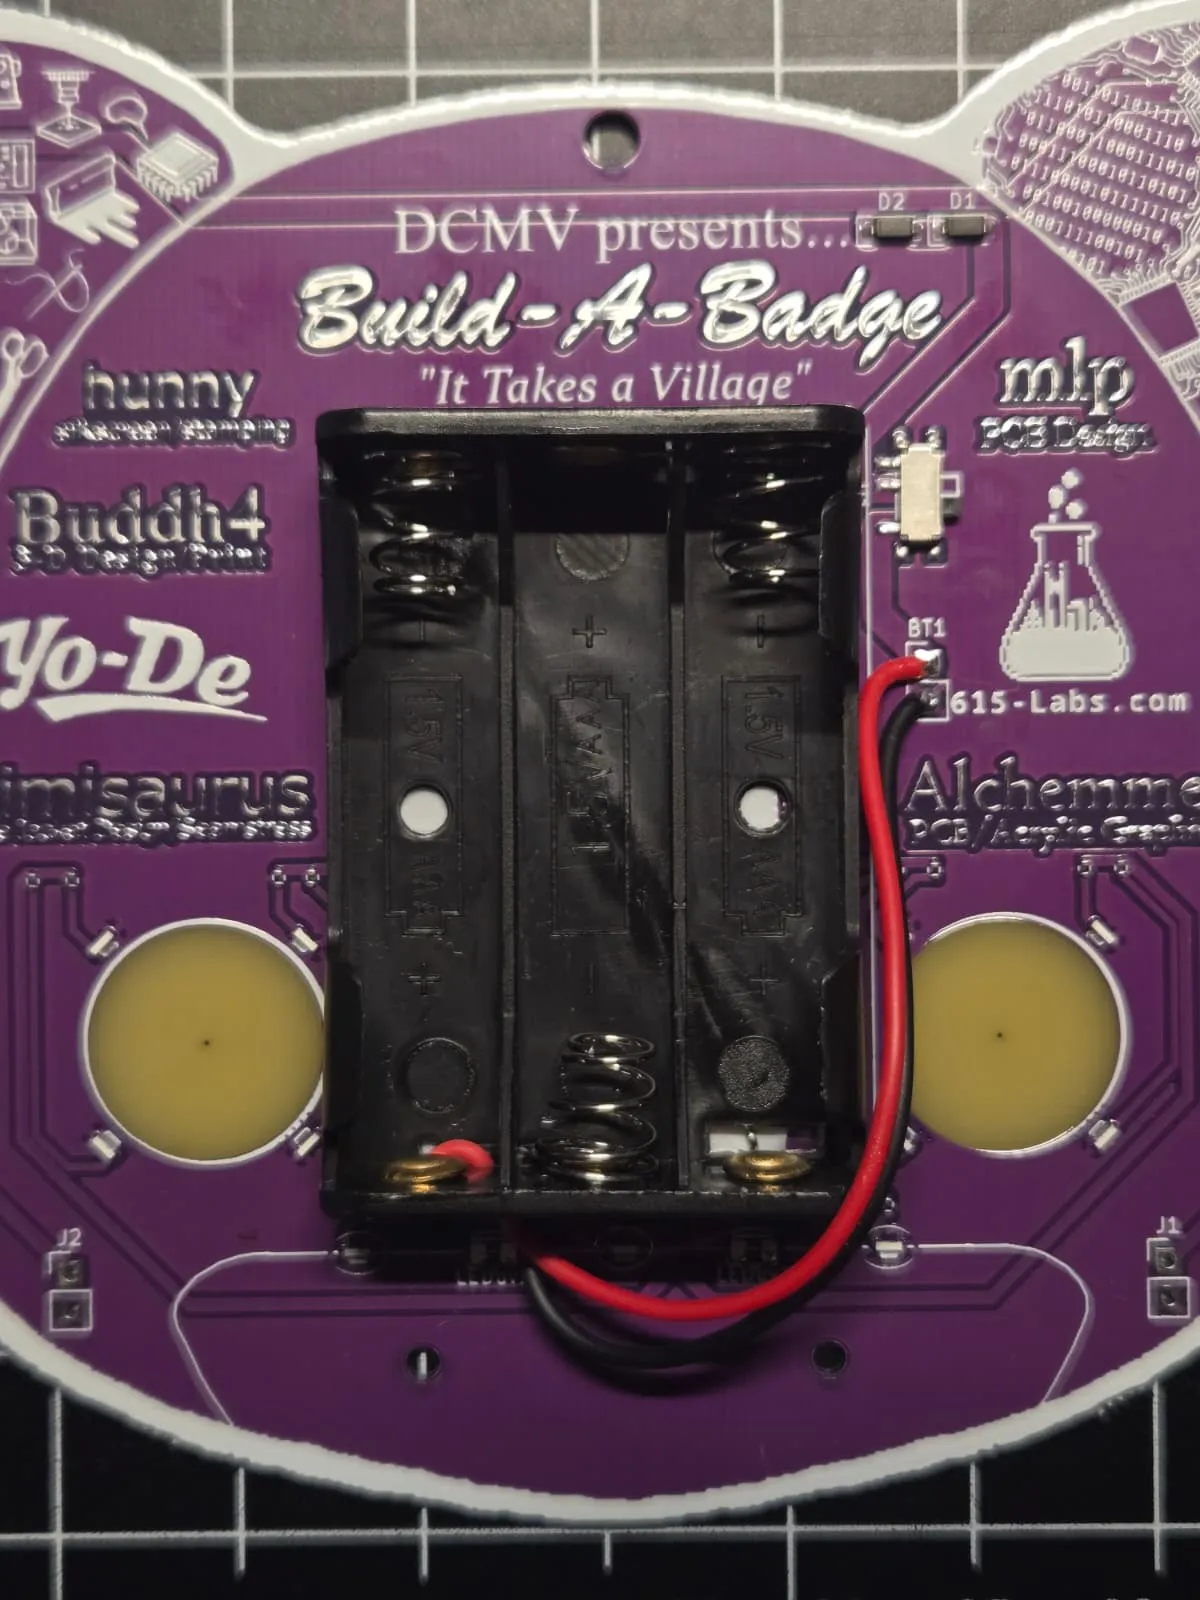
- Once your wires are soldered in place, remove the YELLOW adhesive covering from the back of the battery box
- Place with the the wires down
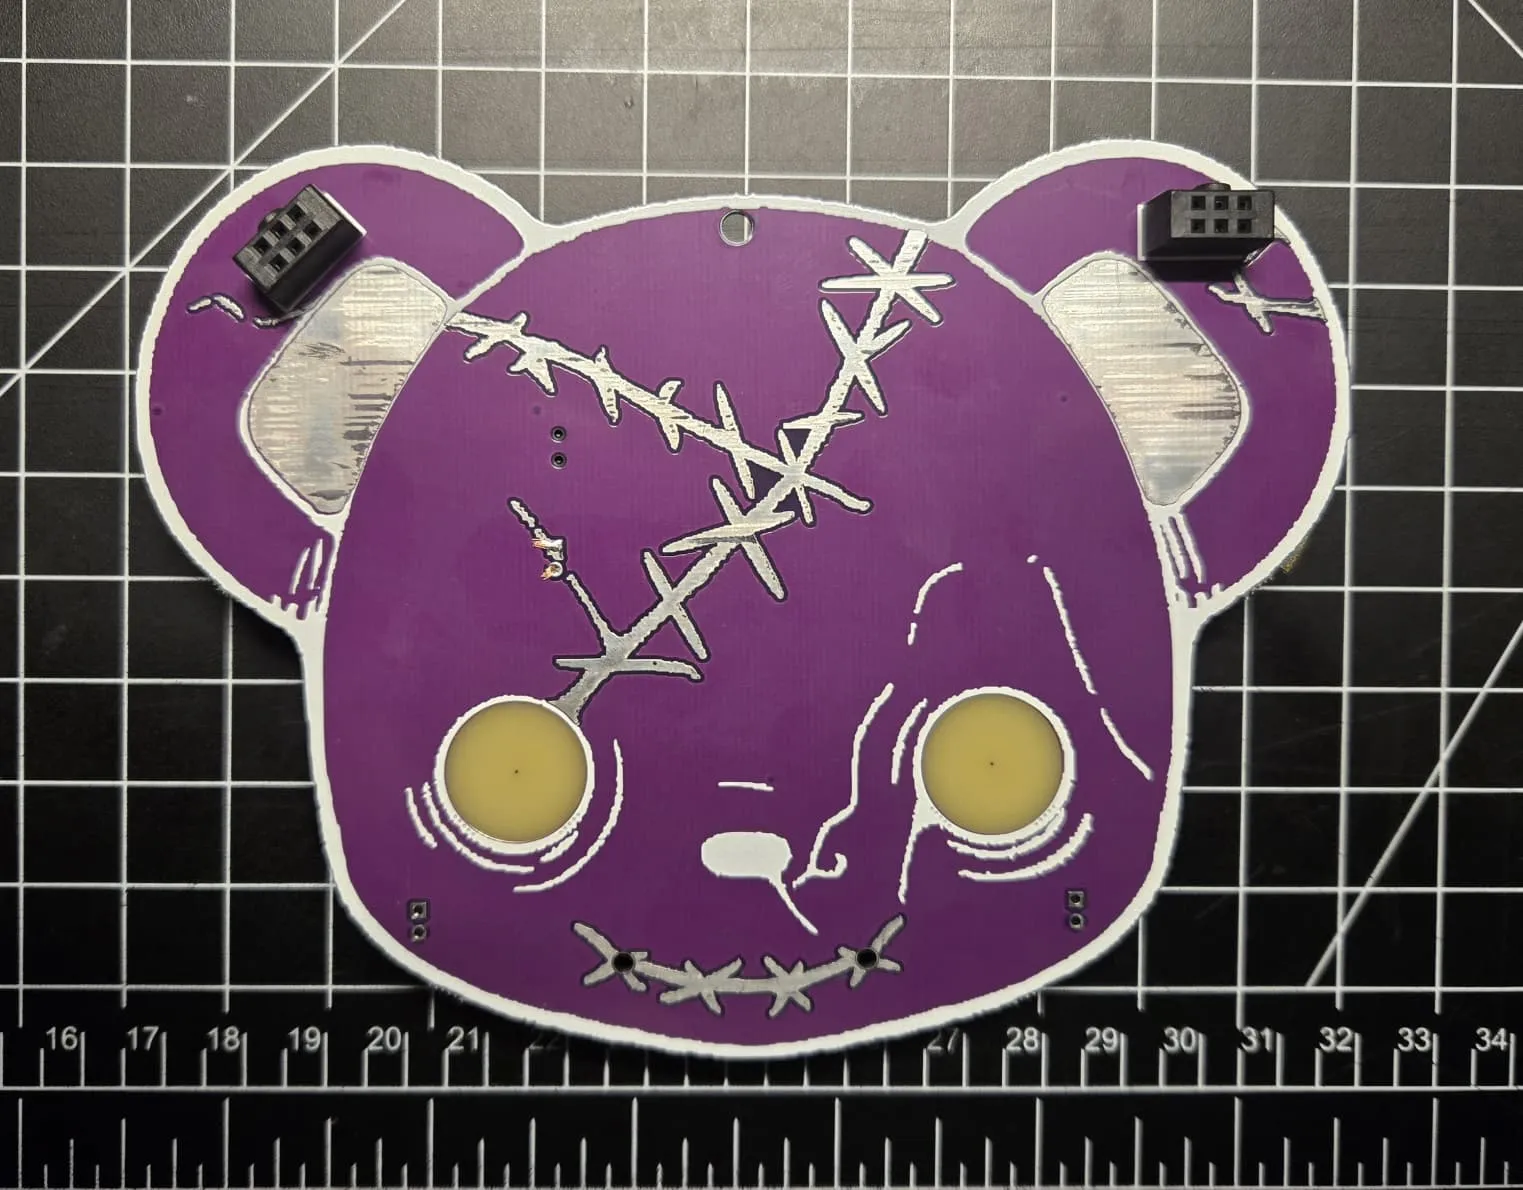
- Solder on the 2 SAO connectors:
- This badge includes 2 SAO connection points on the badge and two included connectors (a normal orientation and 45° canted SAO)
- The ‘keys’ or notches on the SAO connectors will face upwards or outwards depending on the side you’re soldering
- Insert them accordingly and place the badge FACE DOWN to hold them in place while you solder
- QUICK TIP: If you use one of the 3-d printed limb connectors on the under side of the badge, it will keep the badge and the SAO level and flush.
- Solder them as shown below with the same techniques used for the battery box
- Special Add-Ons:
- If you would like to Silkscreen, Stamp, Laser Etch, or Iron on a patch to the battle jacket of your badge, it would be a good idea to get this step done now as removal of the limbs to remove a zippered jacket could prove a bit difficult in the future and could risk the acrylic
- If you would like to have the Makers’ Village laser etch something onto the body, it would be best to do this now before attaching it to the head. You can still do this later, but it may prove more difficult
- Attach the Acrylic Body to the head:
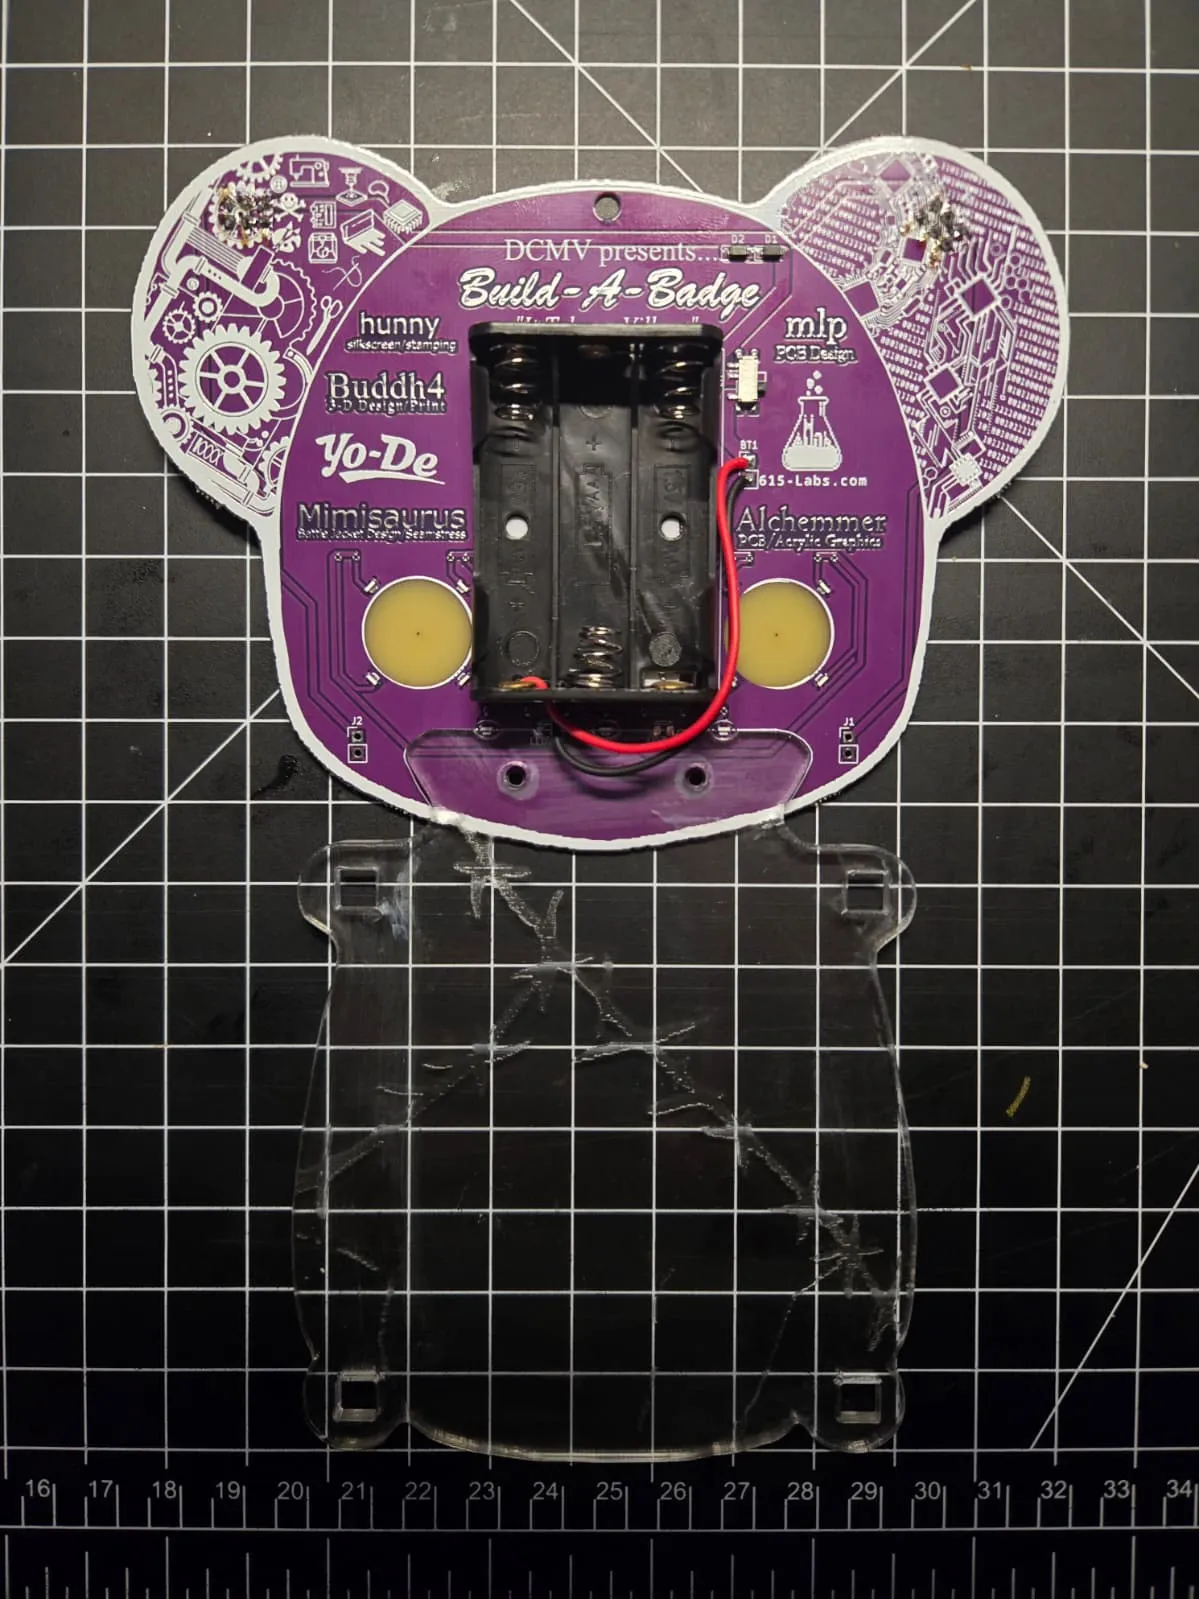
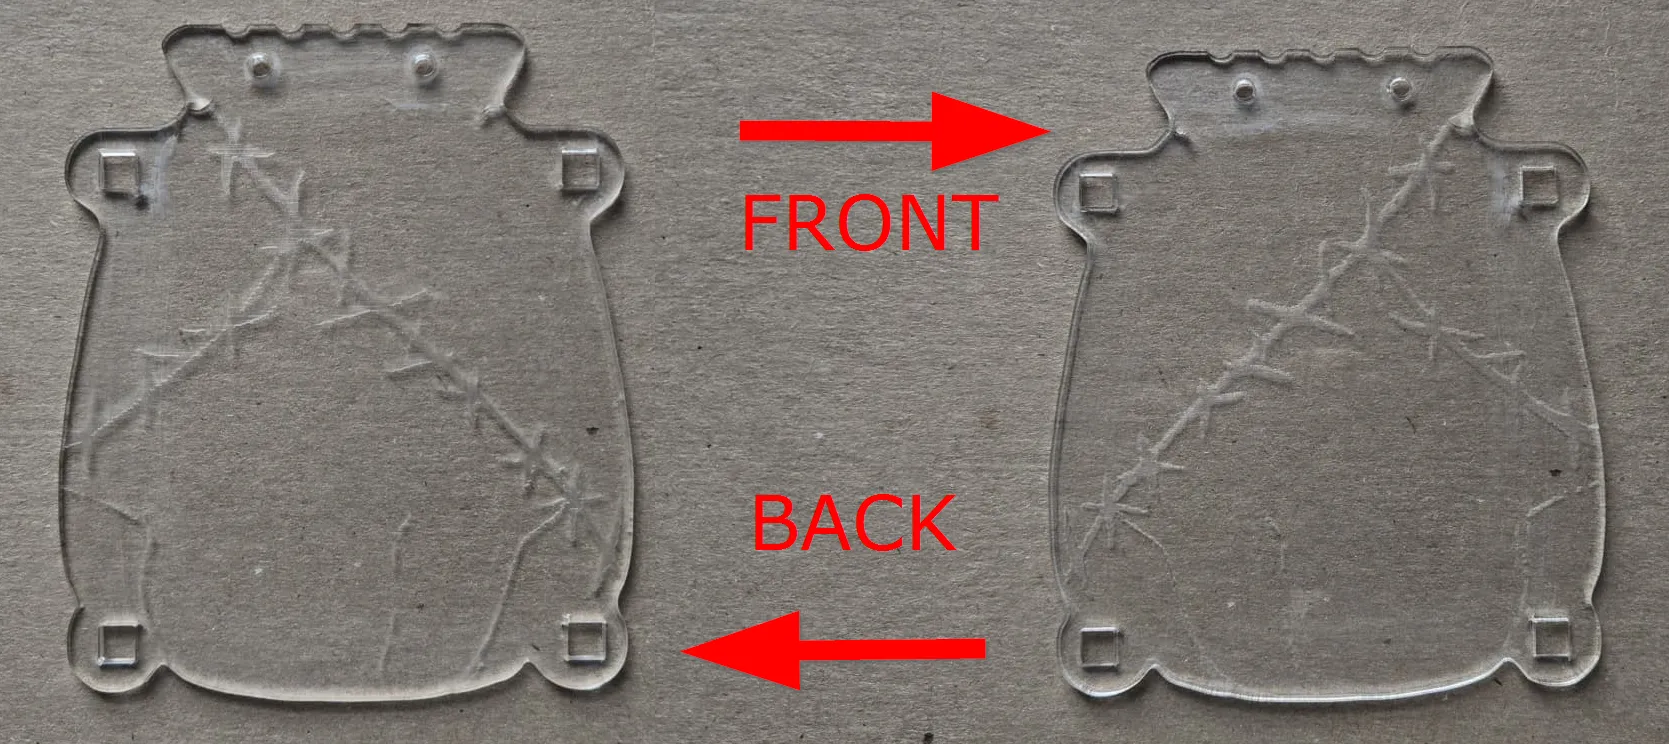
- NOTE: The surface of the acrylic with the etching is the back of the bear. (Technically this is for luminosity purposes while the badge is on, but for best results, please attach with the etchings side facing the back/rear side of the badge)
- Attachment Process:
- You will need a 1.5mm hex driver & a 5mm nut driver
- Place the acrylic on the body as pictured below
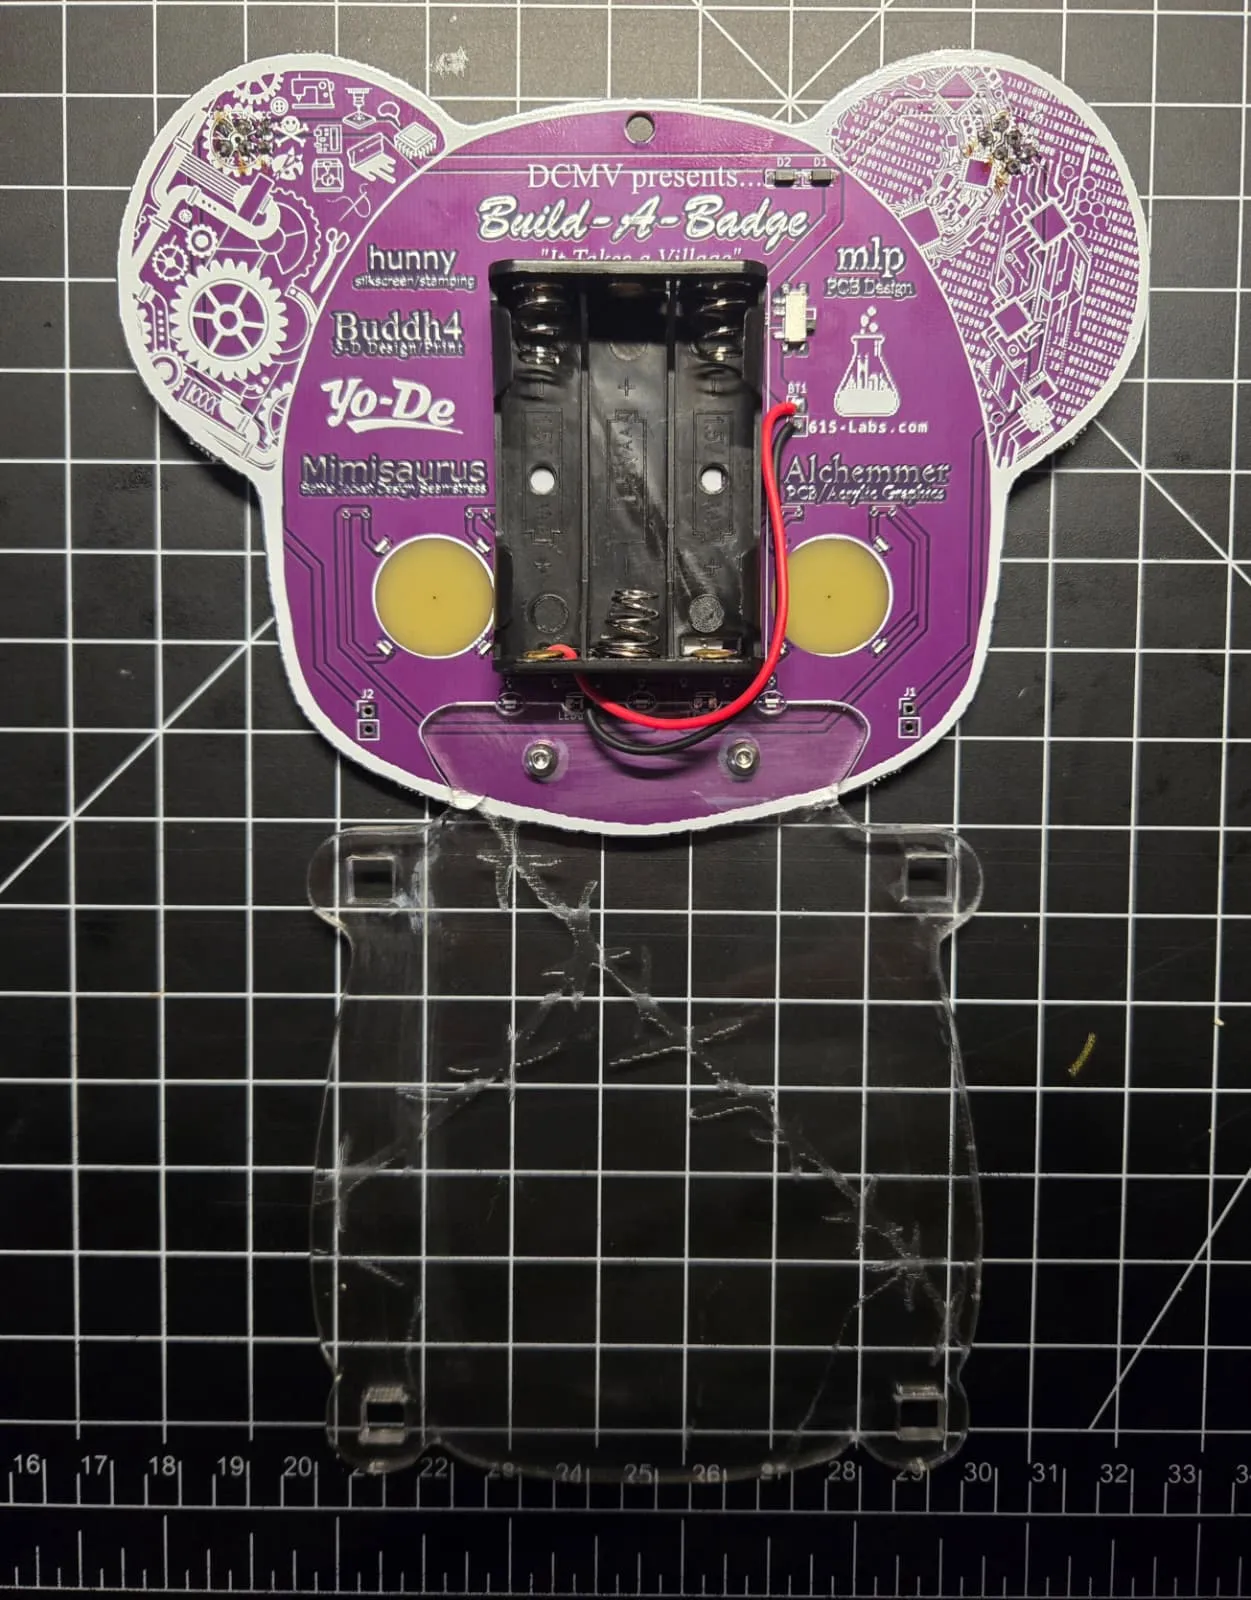
- Insert the screws from the back
- NOTE: screws should pass freely through the acrylic, but will thread into the badge. It will be tight, but the badge holes have been specifically designed to allow the screws to thread themselves through the board. Give it pressure while rotating your driver at the same time to begin the threading process.
- Place them first and tighten them uniformly; the screws alone will hold the body in place, the nuts are for show
- WARNING: DO NOT OVERTIGHTEN; only tighten screws until they’re snug or you risk cracking the acrylic
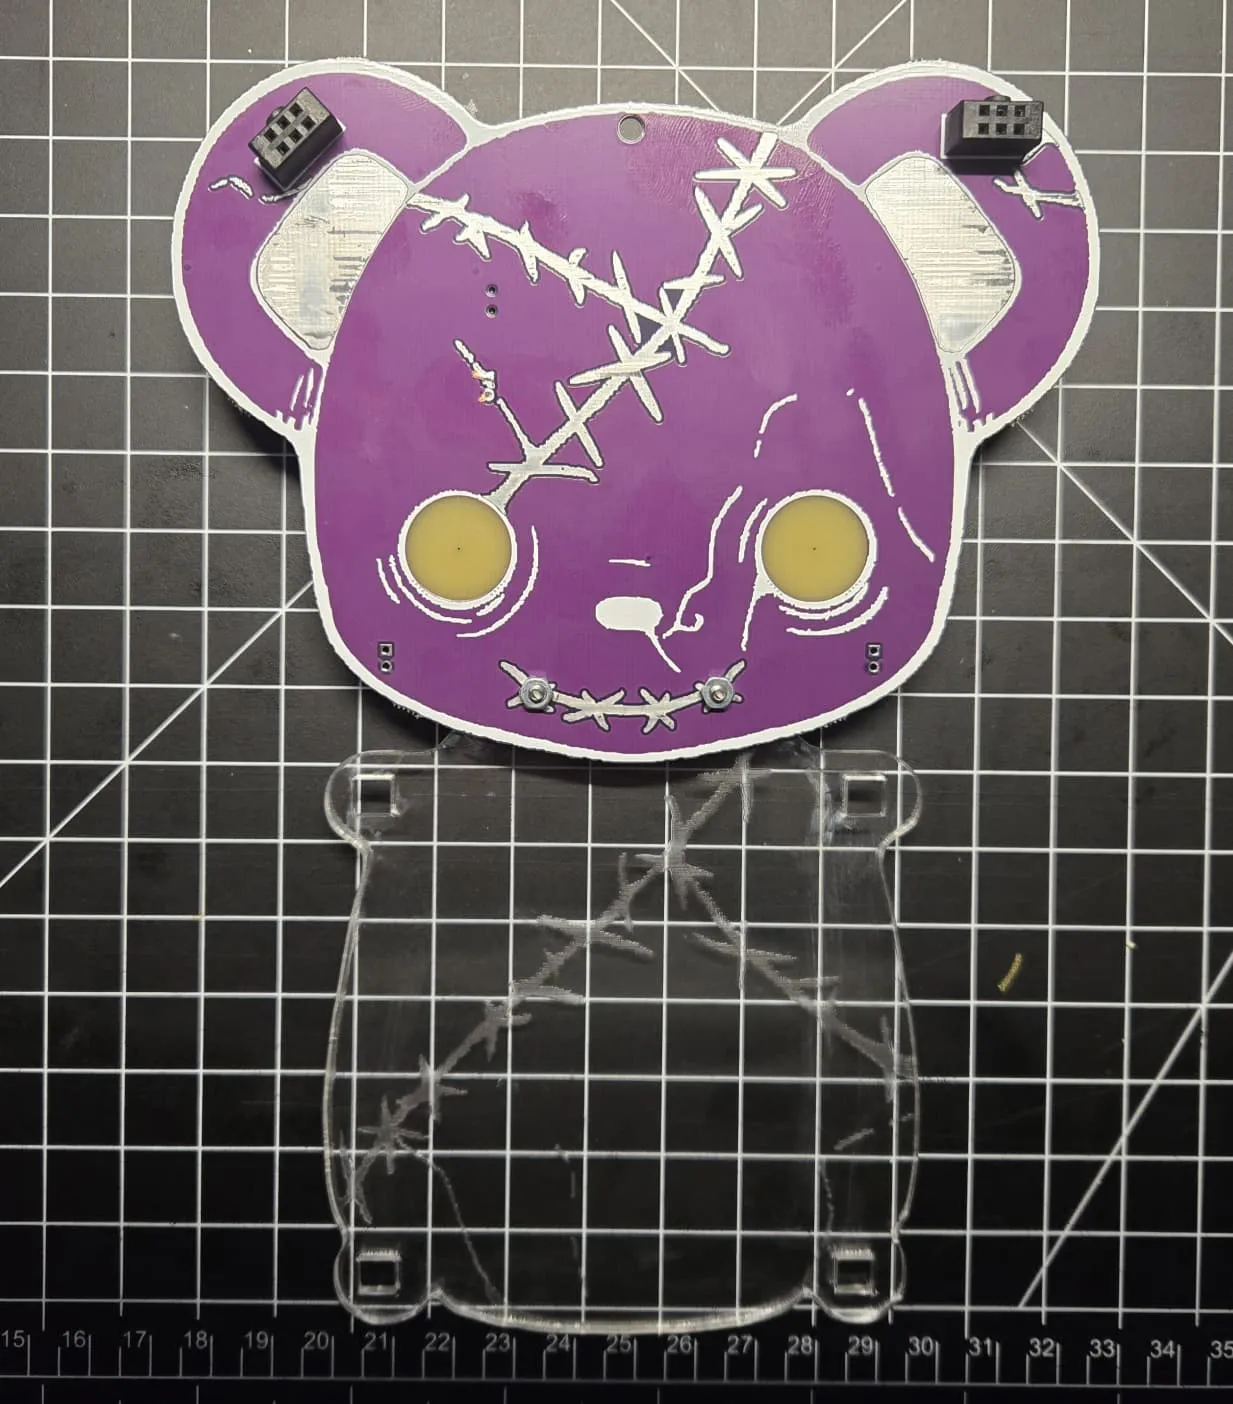
- Sliding on the battle jacket
- The Battle Jackets for this badge are hand sewn and were all tested with one of our acrylic prototypes. They were made with stretchy denim, but given there’s not much material to them, they my not flex as much as a regular article of stretchy denim.
- NOTE: The jacket does NOT unzip all the way. This is by design
- Unzip as far as the jacket will allow
- Place bottom portion of the acrylic body into the top opening of the jacket
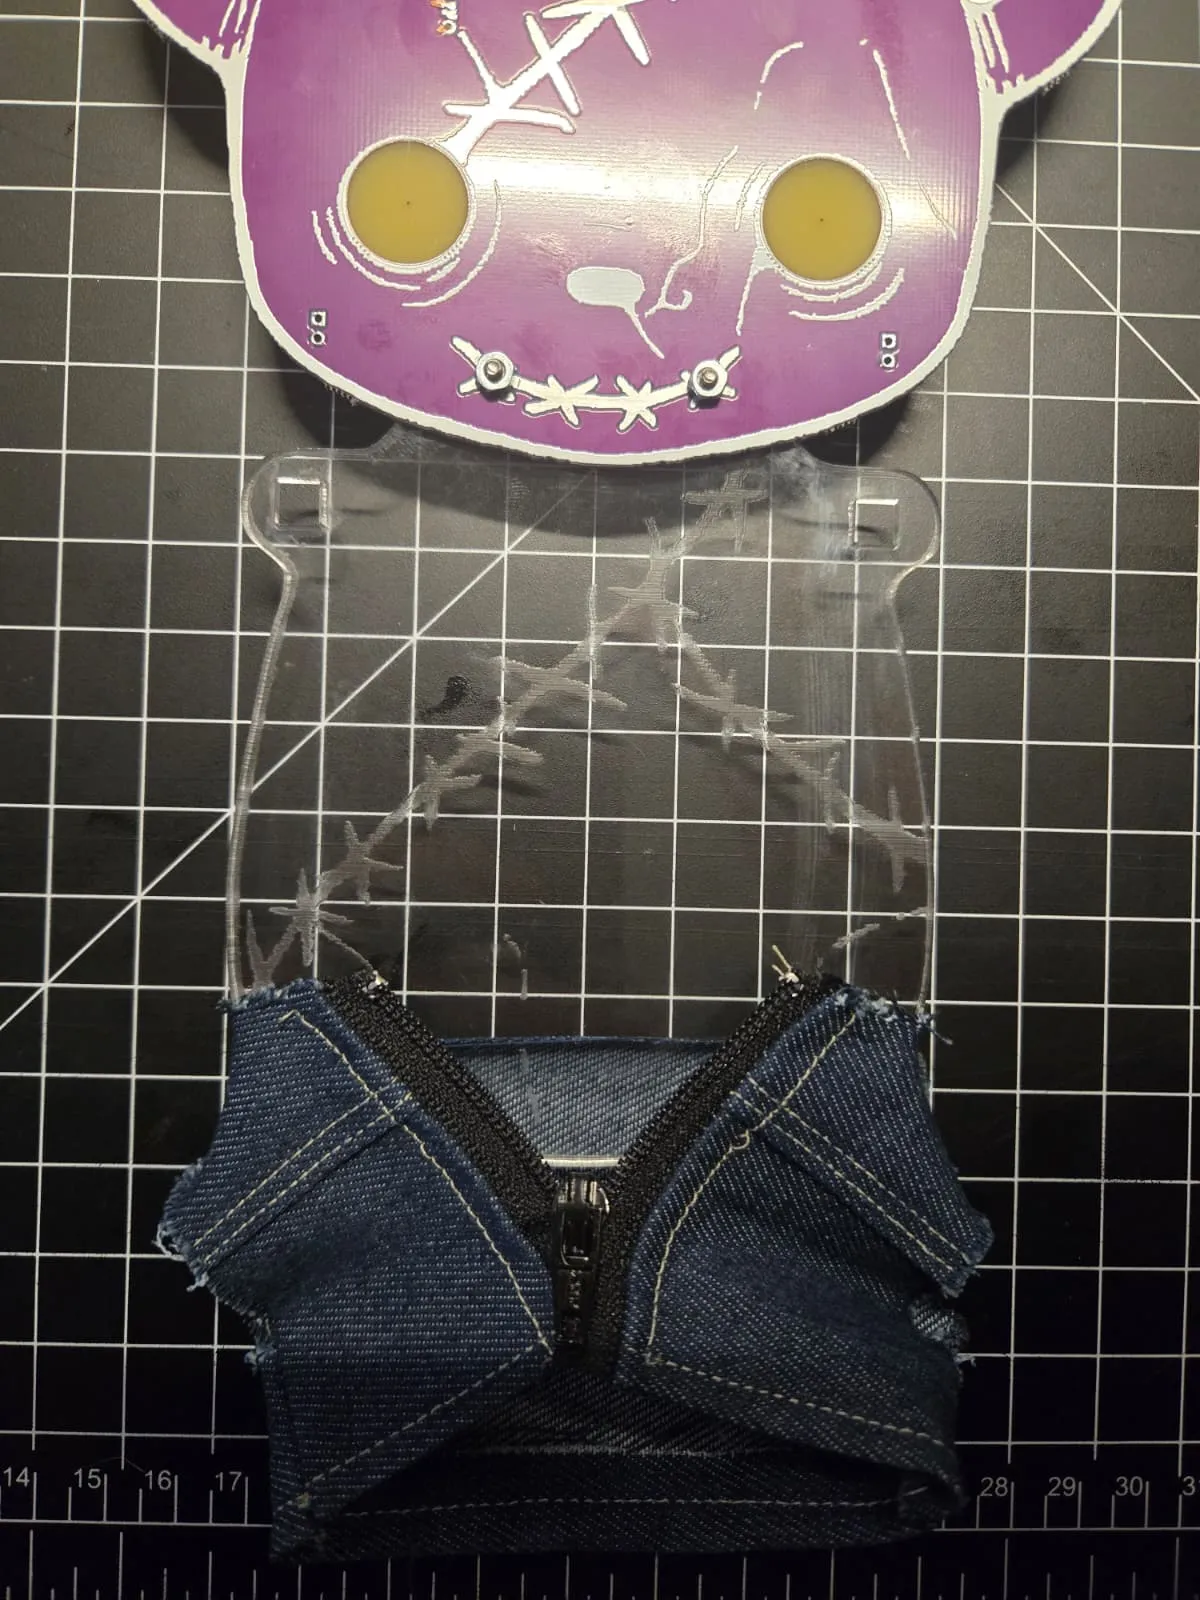
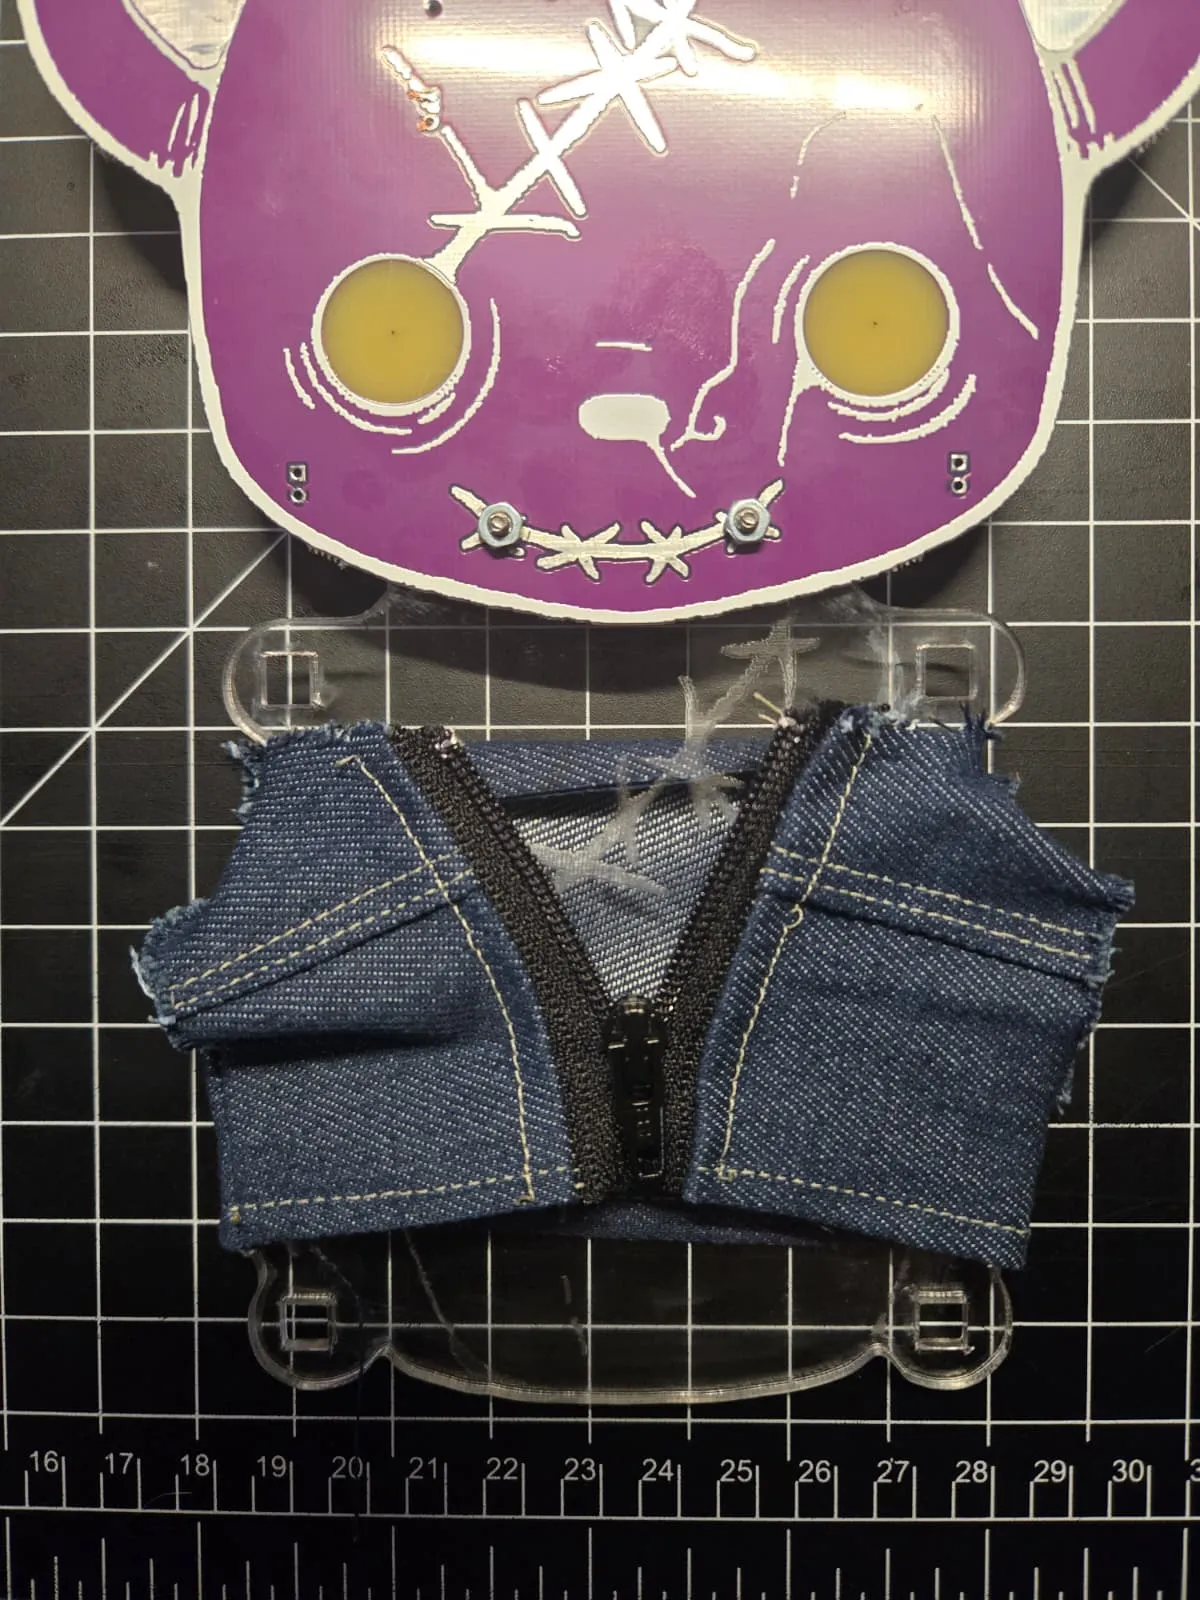
- Work the jacket up and over the acrylic until it’s sitting on top of the shoulders
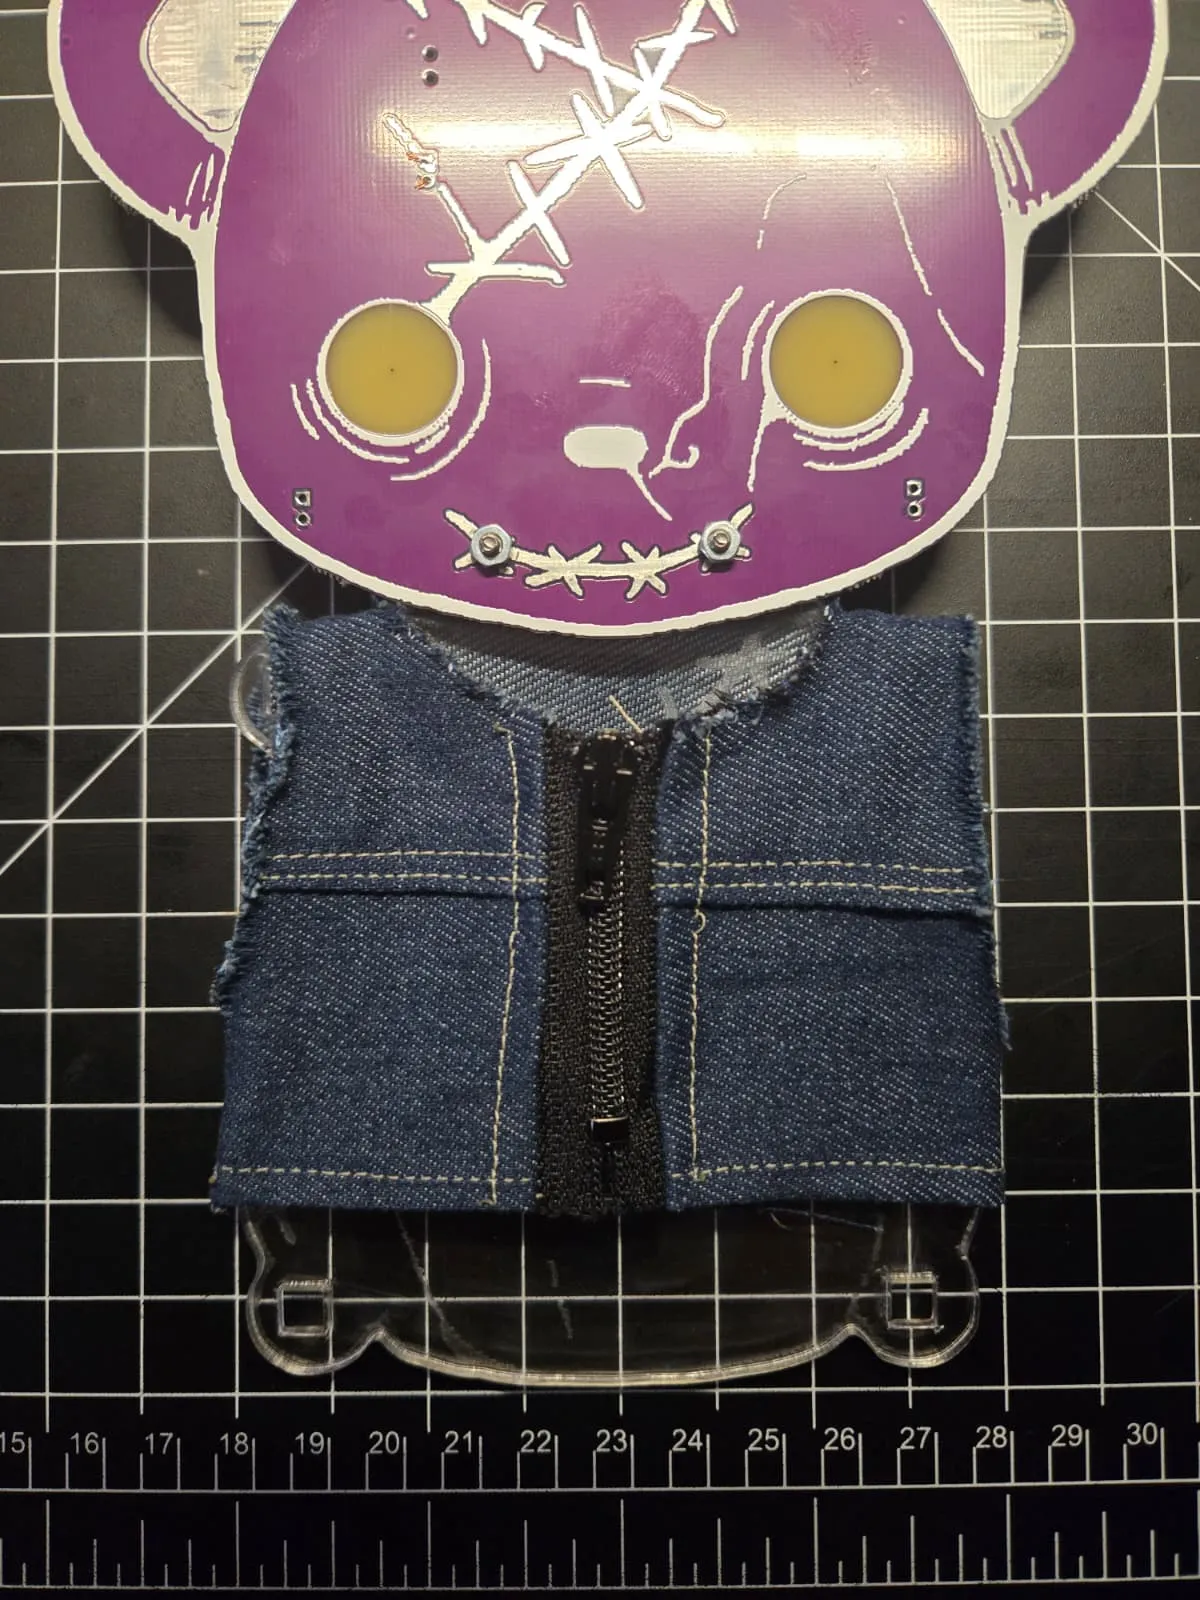
- Adding the 3-d printed limbs
- The 3-D printed limbs will vary in color, but the idea of the bear is to be a patchwork project that you can make your own
- Interchangeability:
- The Arm Pegs are interchangeable;
- The Leg pegs are interchangeable;
- The arm and leg pegs are NOT meant to be interchangeable (This could damage the acrylic)
- Pictured below are the subtle differences in the limb connection pegs (Again, colors may vary)
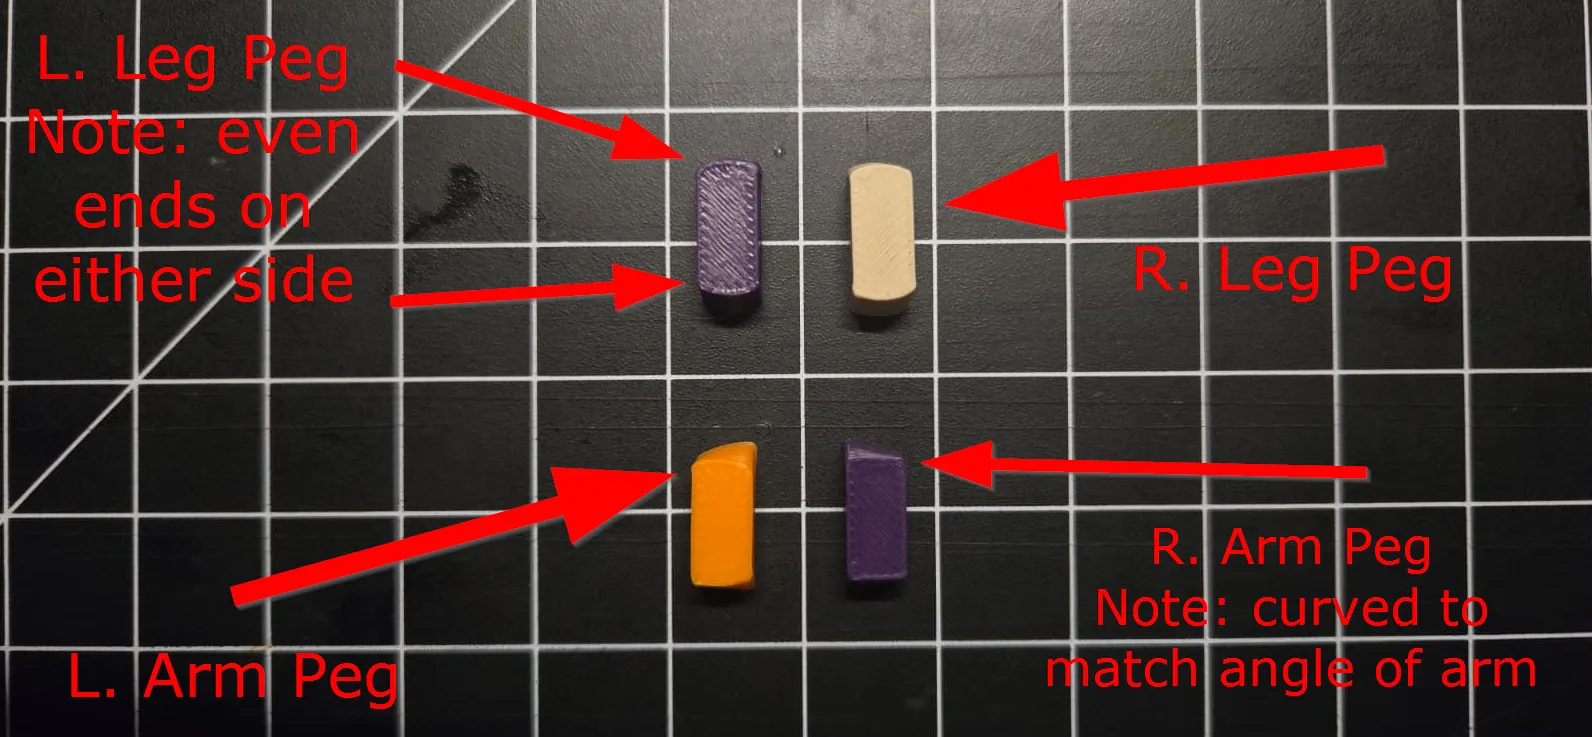
- NOTE: If you need help attaching these, please ask for help in the Makers’ Village
- Attaching the limbs:
- NOTE: If you’re having issues with the connection peg, wriggle the limb a bit as you’re pushing to get it to go through.
- For the Arms, ensure that you’re attaching one limb at a time > Push the battle jacket inward to expose the alignment notch in the acrylic > Line up the arm and when you get it close, insert the alignment peg. > Repeat for the opposite arm These should be snug, but not stiff
- For the Legs, the attachment process will be a little more smooth since you won’t have the jacket to contend with > Align the holes and insert the limb attachment peg > Repeat for the opposite leg
FINISHED!…and you now have you’re very own Build-a-Badge! You can use the included lanyard to wear the badge around the con, or stand it up on your desk at home. (I guess I forgot to mention the badge does stand on its own, so long as you don’t have aggressively large SAOs attached)
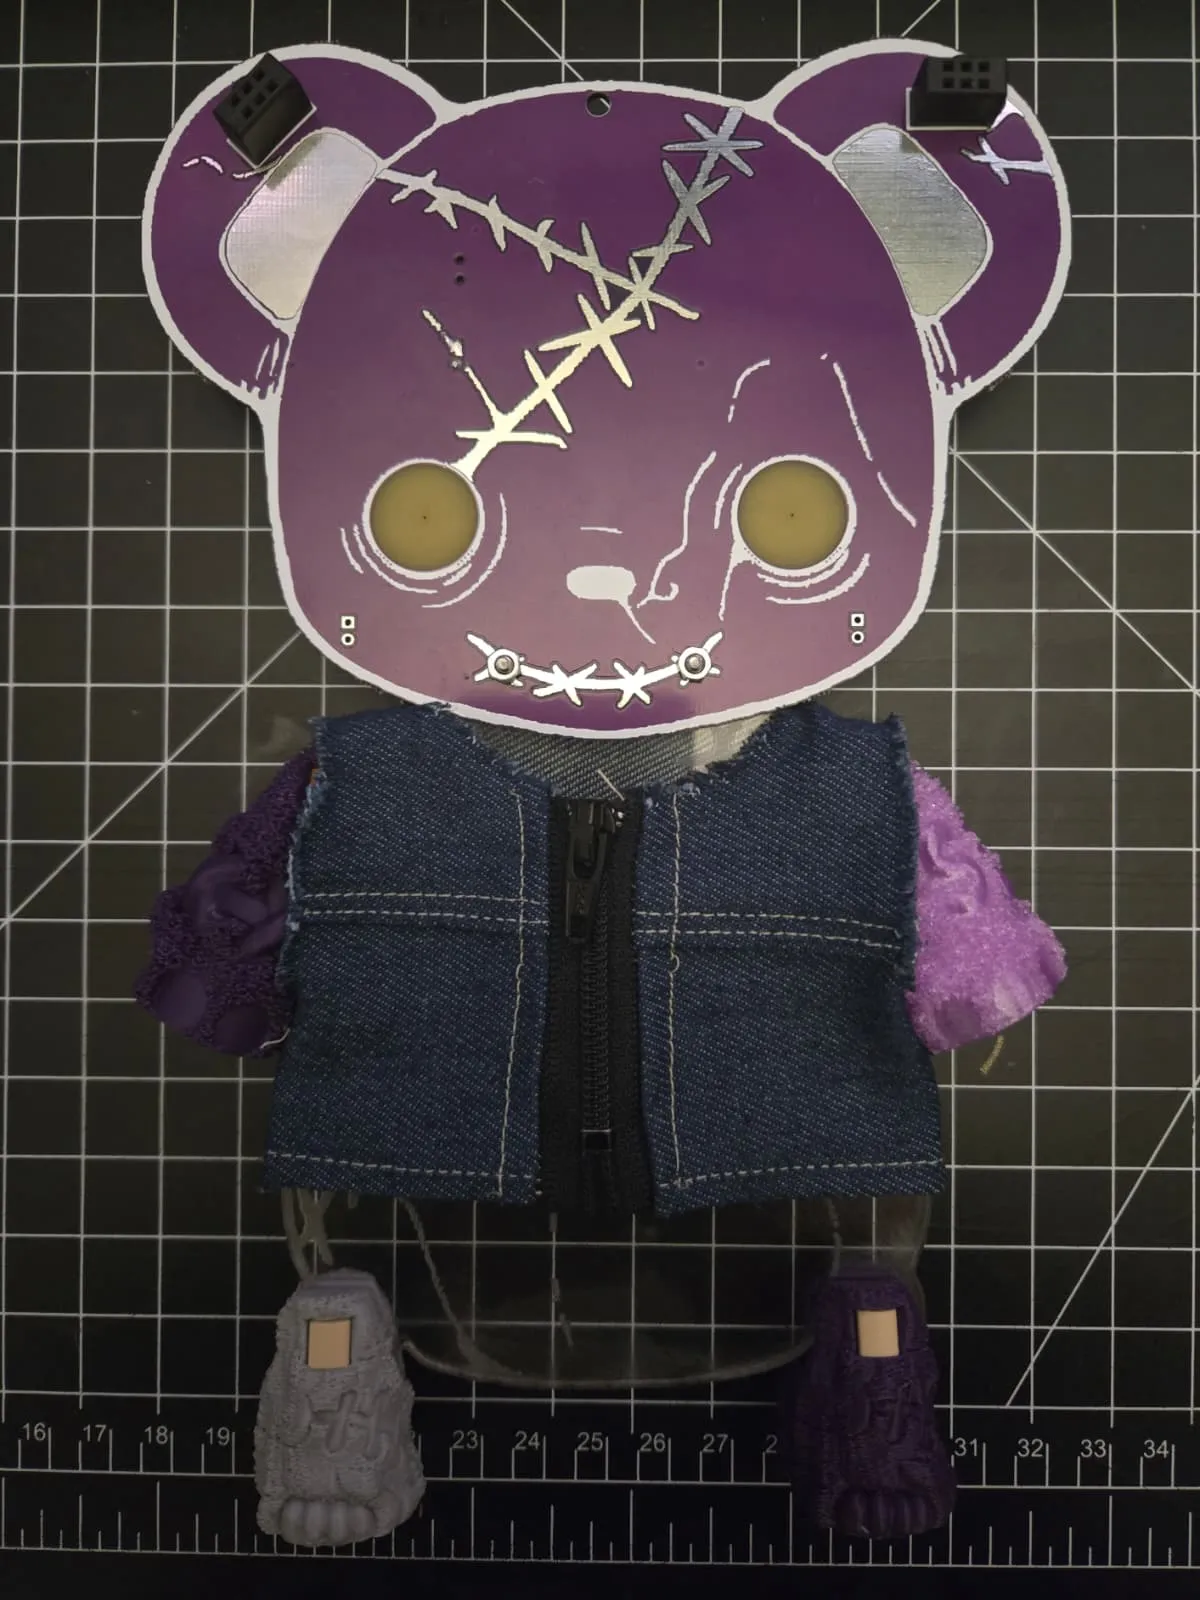
Fun Ideas for customization
- Silkscreening / Stamping / Sewing Patches onto the Battle Jackets
- Light Diffusion with Hot Glue
- Eye Hole Additions (Gears/Cogs, Spirals, Buttons, or anything that the light can shine through.)
- Alternate 3-d Printed limbs of your own design
- UV LEDs in place of the red LEDs for the acrylic (Ask Alchemmer about this mod)
- There are 2 3v3 / GND lines on either side of the head if you’re like to give the bear a meshtastic backpack
Epilogue
A note from the original designer: The idea for the Build-A-Badge kit came from the original thought of bringing physical mediums together as well as their creators. Makers’ Village is about collaboration, skill-sharing, and finding ways of binding unlikely mediums to create some interesting works of functional art. This badge specifically incorporated the base as a printed circuit board, the body as laser-cut/etched acrylic, the limbs as 3-d printed components, and the hand-sewn battle jacket to place whatever you wish on the back of.
The continued ideas for later revisions have involved so many creative things that we have more things on the back burner or have forgotten about them entirely than what we’re actually bringing to DC34, which is saying something when you consider the ‘Masters of the Medium’s and what we’ve already incorporated into this badge currently.
Again, from all of us at 615-Labs and Makers’ Village, thank you for your support and hope that you enjoy your badge .
Donations & Other Cool Stuff
If you would like to make a donation to 615-Labs to further enable cool projects like this, we will definitely donate something in return.
See information regarding donations on our about page